
Format usb from command line mac
Beyond this graphical front-end are some powerful command-line tools that we can use directly. In this series, we'll look at how to replicate the functionality of Disk Utility at the command-line. The following guide will require the use of an external hard drive which will be erased and partitioned. A partition is a logical storage unit located on a hard disk. A hard disk can contain a single partition, making use of all the space it contains, or it can be split into multiple partitions.
In order to store data on a partition, it needs a filesystem. Once a partition has been formatted, this combination of partition and filesystem is known as a volume. Here's a USB hard drive that has been split into 16 partitions, all of which will display separately on the Mac as separate volumes since they've been formatted, though they are all on the same drive. Imagine you have a loft apartment that's just four outer walls.
Choosing File Format System in Mac
Think of partitioning as putting up dividing walls to create additional rooms. The more walls you put up, the more rooms you'll have, but all limited to the total amount of space you first had available. But these rooms can't be used yet, not until you decide what each room will be. Formatting a disk partition is no different than deciding which room will be the bedroom or kitchen. At that point, it becomes a volume. With the introduction of OS X Lion, your Mac's hard disk is split into two partitions with two corresponding volumes.
The second is the more familiar Macintosh HD. Disk Utility is more than adequate to perform any form of disk management for most users. It's also safer than the command-line, displaying warning dialogs before proceeding with any potentially destructive functions. For more experienced users, the command-line offers a greater level of flexibility and control so that what would normally require several different interactions and mouse clicks can be done with just one command. The diskutil command provides many of the features of Disk Utility, from verifying and repairing volumes to changing partition information.
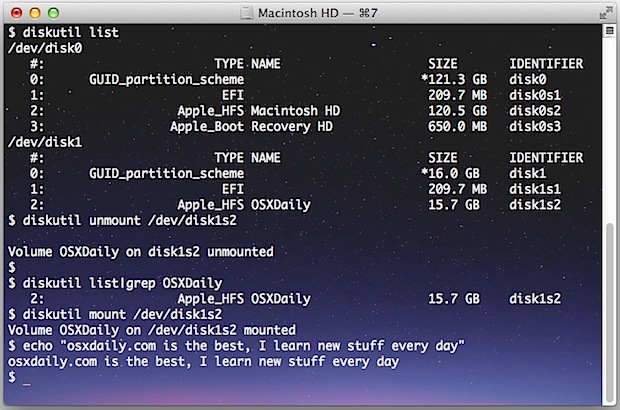
To view the full list of available options for the command, enter the command diskutil. Using the list option will display some basic information about all available volumes and drives attached. Within Terminal, enter:. In the following screenshot, you can see both the Recovery HD and Macintosh HD , both partitions contained on the Mac's internal hard disk. An external hard disk is also connected with a volume labeled Untitled. There are some hidden partitions such as EFI used for the purposes of providing drivers and settings during boot. These aren't volumes since they cannot be mounted.
Depending on whether you have features such as FileVault 2 or Fusion Drive, your partition layout might differ slightly to what is pictured above. For many of the options within diskutil , it's necessary to use the disk or partition's Identifier. Using list will provide you with this information. Should you have a number of disks and only want to view information about a specific one, you can append the disk identifier to the command:.
The first number represents the physical disk identifier. The number following the letter "s" represents the partition number. If a disk has three partitions, it would follow this convention:. In addition to list , you can also use info with the corresponding identifier to display even further information, like so:. As within Disk Utility, the diskutil command can be used to verify or repair volumes of any errors and is very straightforward to do using either verifyVolume or repairVolume.
- flash player update mac check.
- my passport for mac 1tb 3.0;
- Hint Options.
- How to Erase a Disk from Command Line in Mac OS X.
These options don't need the disk identifier, just the volume's name:. If the feedback within Terminal looks familiar, that's because it's the same information Disk Utility provides. Erasing disks from the command-line can be a dangerous process as there aren't any warnings or confirmations. One typo could lead to irreversible data loss if there's no backup to restore from. If you're not familiar with the command-line, Disk Utility is just as capable.
You can either erase a whole disk which will remove any partitions stored upon it, or individual volumes without affecting others. To erase an entire disk, you'll need the disk identifier, enter the following, adjusting the disk identifier to suit:. Ownership of the affected disk is required. You cannot erase the boot disk. Single User Mode alone is not sufficient to erase the actively booted operating system. Enjoy this tip? Subscribe to the OSXDaily newsletter to get more of our great Apple tips, tricks, and important news delivered to your inbox!
- extensions manager mac os 9!
- best audio software for mac;
- no audio from hdmi to tv mac.
- How to Format an External Drive in OS X?
Enter your email address below:. Thanks for the interesting article.
The spreading of knowledge should never be discourage. They will learn something from it. And no great disaster will occur. My story is I hand off USB and other older hard drives. One way I was taught was to hard format a drive in Windows, then do similar in Mac, then again format in Windows, then add the data. For jpgs, this should elimant many software recovery options. My understanding of how your trying to do secure deletes: As a bare minimum overwriting the whole disk 7 times is considered just about acceptable.
Why is Apple holding back from implementing a modern disk file system on their computers? The specs for one of these was offered to them and basically everyone else free of charge, quite a few years ago by Sun Microsystems. Apple charges a higher than normal price for what I will admit is a higher than normal quality machine. So, please, put a few of your brilliant engineers on this, would ya? Failure should not be an option. Maybe they will release new Macs in that time that could use it.
Under the strictest supervision from Apple, I was able to do this from the command line. There are several alternative appearance settings.
Disk Management From the Command-Line, Part 1 - The Instructional
After this shows up in terminal.. This is what I see. This worked great, thank you so much for showing me how to erase a hard drive from the command line. Hi — Despite my double checking the list to identify the right dev to delete, I deleted a drive that had all of my photos. I have four drives in an external Stardom stack. I was having problems with a corrupted drive. Do you have any advice on how to retrieve the files?
EFI How do I continue? Apple Devs are going down the drain these days! Hi, I tried a lot of command from here but was not able to repair my GB lexar flash drive. I got this error: Wiping volume data to prevent future accidental probing failed Can anyone help me on this?
On MacOS But the CLI way went alright! Hi, I tried a lot of command from here but was not able to repair my 16GB flash drive.
How to Format USB Drive on Mac
Wiping volume data to prevent future accidental probing failed I spent two days on it and found no solution. Please help me on this? Thank you for this. I follow the instructions, and I received the message:. This is an article for Mac, it is erasing a hard drive from a Mac command line, it is not a Windows tutorial. You can, however, format a Windows hard drive from a Mac if you connect the Windows hard drive to the Mac and format it through Disk Utility, or the command line as described above.
How to Format USB on MAC?
If you are having a hard time using the command line, try the Disk Utility app, which is simpler and uses the GUI. Gopper, Who said that I was using the command line code in a windows machine? In fact, that commands wont work in windows. Hey Luis, have you found a solution to your problem? I bought a new hd, and keeping the old one until find a way to format it. How are you going in your searching?
Thank you! This post is older, but incredibly relevant when you need it. Again, thank you. But I keep getting: Could not mount disk2s2 after erase error Error keeps showing. Name required.
Mail will not be published required. All Rights Reserved. Reproduction without explicit permission is prohibited. Enter your email address below: Posted by: Bev in TX says: August 30, at 2: Paul says: Bob says: August 30, at 4: August 30, at 8: Anon says: November 22, at 2: Sean says: August 30, at 5: