How to transfer photos from iphone to mac desktop
- 6 Ways to Transfer iPhone Photos to iMac/MacBook/Mac Mini/Pro.
- How to Transfer Photos from iPhone/iPad/iPod to Mac!
- best web development application for mac.
When presented with the Share screen, look under AirDrop for the Mac you want to transfer photos to. Tap the icon for that Mac, and if all works well, AirDrop will begin transferring the photos to that computer.
3 Methods to Transfer photos from iPhone to Mac Computer
Note that you may be asked to confirm the transfer on your Mac before the file transfer will kick off. If you use a cloud storage service like Dropbox, Box, or Microsoft OneDrive, you can likely use it to transfer photos to your computer—and all your other devices, for that matter. Look to see if your cloud storage service offers an iOS app: Most major cloud storage services do, and they often allow you to save photos to your account with just a few taps. Most of the options outlined above work great for copying over a handful of photos at a time, or if you want to import your photos only once and a while.
But if you want to keep your Photo Library in sync across all your devices, look no further than iCloud Photos. You may already have iCloud Photo Library switched on without even realizing it.
How To Transfer Photos From iPhone To Computer (Mac & Windows PC)
Once you have iCloud Photos enabled on your Mac, do the same on your iPhone. He likes puns and the color yellow. Open the Image Capture app on your Mac, and unlock your iPhone if prompted. Select iPhone in the Devices section on the left of the window. Your iPhone photos will appear on the right:. Now select the photos you want to import. Hold down the Command key to select individual photos.
- Five easy ways to get your iPhone photos onto your Mac?
- Five easy ways to get your iPhone photos onto your Mac | Macworld!
- How To Transfer Photos From iPhone To Computer (Mac & Windows PC).
- Part 2: How to Transfer Photos from iPhone to Mac with iPhoto!
- disable chrome notifications icon mac!
- How to transfer photos from iPhone or iPad to Mac!
Or to select a group of images, click the first photo, hold down the Shift key, then click the last photo. Click into the Import To box at the bottom of the window, and select the folder you want to copy the photos to. To view more folders or make a new folder, click Other in the pop-up list:. Click Import at the bottom right to transfer the selected images to your computer. Alternatively, you can import all images from your iPhone by clicking Import All.
So if you have a Mac, you can use AirDrop to transfer photos from your iPhone to computer. Or swipe up from the bottom of the screen, then make sure the Wi-Fi and Bluetooth icons are both blue:. Your Mac also has to have Wi-Fi and Bluetooth switched on. The icons for these are at the very top of the screen.
On your phone, open the Photos app and locate the images you want to copy. Tap Select at the top right, then select the photos you want to transfer. Tap the Share icon square with up arrow at the bottom left of the screen:.
Choose where you want to keep your photos and videos
Tap the name of your Mac to transfer the images from your iPhone:. Photos that you transfer to your Mac via AirDrop will appear in the Downloads folder. On your Mac, open Finder , then click Downloads in the left-hand sidebar. You can now move the photos from Downloads to a folder of your choice using drag and drop. Free Video Reveals Table Of Contents: Section 1: First you need to decide whether you want to transfer your photos wirelessly or with a cable. What Is iCloud Photo Library? To switch on iCloud Photo Library, check the box next to Photos: Check the iCloud Photo Library box: Windows Photos App On Windows 8.
If you have a Windows 10 computer , follow these instructions: Now your images will begin to download to your computer! If you have a Windows 8 Computer , follow these instructions: Next, select all the items you want to transfer to your PC. This window offers several options: Double click this icon to open up the folder directory on your iPhone: Select the Photos checkbox, then click Options next to Photos: When the two devices are synced via iCloud, the Photos app on your Mac will display the same collection of photos that you see on your iPhone: Your iPhone photos will appear on the right: To view more folders or make a new folder, click Other in the pop-up list: Or swipe up from the bottom of the screen, then make sure the Wi-Fi and Bluetooth icons are both blue: Tap the Share icon square with up arrow at the bottom left of the screen: Tap the name of your Mac to transfer the images from your iPhone: Select your computer form the device list.
All the selected photos will be transferred to your Mac wireless in a few minutes. Actually, there is no limition on using this program and you can not only transfer photos, but also for text messages, contacts, music, video and ebooks. What your need is an USB cable. This is the ultimate program regarding data transfer for iPhone and it's the one that I can't live without.
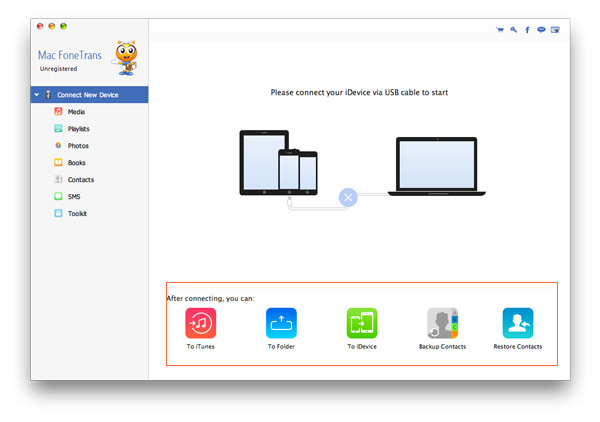
It runs much simple and fast then the above two methods. Flexibility is the my favorite part of the app. Check out how it works:. Unlike the above two methods, this works on both Windows and Mac. If you were on a Mac, then download the Mac versionof the program and install it on your computer. When installation is finished, launch the app from Launchpad.
The main screen of iPhone Transfer is shown as the following:. It takes a few seconds to let the app scan and analyze your iPhone. After that, it will list all the files into groups as you can see from the sidebar. Click on Photos category, then you can preview all the photos. Select the photos you want to transfer to Mac. Then Click Export to button on the menu bar.