
Pop art photoshop tutorial mac
Click and drag over the woman to create a selection.
- best cad for mac os x.
- deleting cookies on a mac?
- PART 2. Adding Colour;
- Make your own pop art portrait | Creative Bloq?
- fleetwood mac may 25 2013?
- By Melissa Evans.
Click OK. Add a new layer below the original and set your foreground and background colors to black and white. This will set the background color to white. Join Our Creative Community Access the best video tips, design hacks, and deals straight to your inbox.
Turn your images into pop-art – The Graphic Mac
Select all of the layers, right click, and select Convert to Smart Object. You will now have a single layer. Steps 6 — 10 are optional. Pop art turns out best with high contrast images. Click on the Selection Tool , then click and drag within the shirt area until the entire shirt is selected.
With the new Layer selected Layer 1 , click on the Burn Tool. This tool darkens the image wherever you drag your cursor. Click and drag across the shirt to darken the shadows and creases. Pro tip: Hiding the bottom layer will make it easier to focus on the area of the image that you want to burn.
- How to Create Pop Art in Photoshop - Storyblocks Blog!
- connessione internet lenta su mac!
- xbox controller for mac wireless;
To hide a layer, click on the eye symbol next to the layer icon. Once you are satisfied with the contrast of the shirt, select both layers, right click, and select Convert to Smart Object. Select the Halftone Pattern filter. This tutorial is from our Photo Effects series. Let's get started!
In order to create our pop art effect, we need the subject of our image to be separated from its background and placed on its own layer above the Background layer, which means we need to first select the main subject. You can use any selection tool you want here because you don't have to be overly precise with your selection, since we're going to be removing most of the details from the image anyway.
I used the Lasso tool, but if you prefer the Pen tool, for example, that works too. Go ahead and draw a selection around the main subject of your photo:. I named my new layer "threshold", and we'll see why in just a moment. Click OK when you're done, and Photoshop copies your selection onto a new layer above the Background layer:.
Topic Tags
Now that we have the main subject on its own layer, we're going to hide the background from view and replace it with a solid color. First, click on the Background layer to select it. We want a solid color behind the main subject, so select Solid Color from the top of the list that appears:. This brings up Photoshop's Color Picker. Go ahead and choose any color you want right now for the background.
It doesn't matter which color you pick because, as we'll see later, you can always go back and choose a different color any time you want. I'm going to choose a light blue for now:. Click OK when you've chosen a color to exit out of the Color Picker. Here's my image with my solid colored background:. And I can now see in my Layers palette that I have a solid color fill layer between my Background layer and the "threshold" layer:.
- insert pivot table excel 2010 mac.
- whole grain mac and cheese kraft.
- nu sinh khong mac noi y nhay gentleman?
- install trapcode particular after effects cs5 mac?
- beach head 2002 for mac.
- Make your own pop art portrait.
- How to Create Pop Art in Photoshop;
Next we need to convert the main subject to black and white and remove most of the detail, and we can do that easily using Photoshop's Threshold adjustment. First, click back on the "threshold" layer to select it in the Layers palette. Then, go up to the Image menu at the top of the screen, select Adjustments , and then select Threshold.
This brings up the Threshold dialog box:. Drag the slider at the bottom of the Threshold dialog box circled in red above until you've removed most of the details from the image, leaving just enough to still be able to make out the main areas. In my case, I've left just enough detail to still be able to make out the girl's eyes, nose, mouth, and so on, yet the majority of the image detail is now gone:.
In order to create the pop art effect, we need to be able to colorize the different areas of our main subject separately from each other, and in order to do that, we need to select each area and place it on its own layer. Rasterize the fill? Now for the colouring.
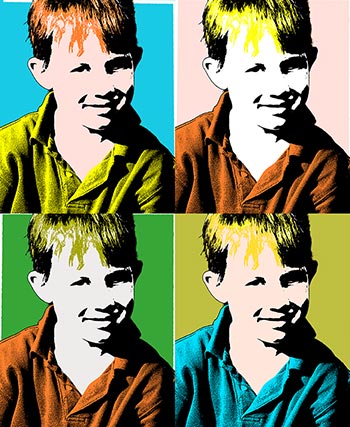
Simple Pop Art Effect With Photoshop
Change the foreground colour to white. Get your Paint Brush Tool and start painting where you want to the colour to appear. Make sure that you zoom in when colouring , so that it is nice and tidy! Below is my layers palette. At any time if you are unhappy with a colour that you have chosen, simply double click on the Layer Thumbnail as shown above and re-select a colour. Now you have the ability to change the colour of the hair for example, to a whole new colour in a second flat!!
Step 2. Select and Mask.
You will need to add a caption, or a speech or thought bubble to make this a Lichtenstein inspired piece. Custom shapes have a few speech and thought bubbles to choose from. Try experimenting with the colours too for something really bold. The picture of my layer palette below pretty much explains it all.
Obviously the line art is the top layer.