Wd external hard drive mac compatible
The most notable upgrades with this line are an increase in maximum capacity 3TB , customization options, improved backup capabilities, and a line of models designed specifically for use with Mac OS. This review explores the Mac models, but the other new features are detailed in the new My Passport Ultra 7th Generation review.
This line of drives is more or less just an adaptation of the My Passport Ultra that is optimized for Mac out of the box. The regular My Passport Ultra is compatible with Mac OS after reformatting, but users that know that they will be using a Mac might find this model to be easier.
Users can run diagnostics and format the My Passport with WD Drive Utilities, but other than that it is a plug and play drive that can be used to transfer and store up to 3TB of data.
- How to Format a WD hard drive to exFAT or FAT32 File System | WD Support?
- spore creature creator demo download mac.
- adobe cs6 master collection mac direct download.
- Boost your Mac's capacity?
The USB 3. All models carry a 3-year warranty. WD gave the My Passport a design that would pair well with modern Apple computers, with a textured aluminum finished along the sides and bottom. The top is black with some branding, and the edges are rounded. In terms of dimensions, it is identical to the My Passport Ultra.
Reliable Mac-ready high capacity portable storage
There is a single USB 3. The bottom of the device has some branding and product information. Since this device is optimized and preconfigured for Mac, setup is quick and easy. The diagnose tab allows users to check for drive failures with Run Drive Status Check. There is also a Sleep Timer tab for power conservation and drive longevity; users can schedule their device to enter sleep mode after a certain amount of idle time. Users can quickly clear their device of all data with the Data Erase function.
This reformats and renames the device, and removes any passwords that have been added. WD Security, another program used to manage the My Passport for Mac, is used to configure passwords for the device. From the Applications folder, open Utilities , and lastly double-click on Disk Utility. Disk Utility will now be open. From the left-side pane, choose the drive that is to be re-formatted. Typically there are two listings for each drive unless more than one partition exists on a particular drive. Choose the drive listing that is farthest to the left Not indented for the drive to be formatted.
It is usually directly above the name of the drive. Erase After selecting the appropriate drive, additional option buttons will become available on the top part of the Disk Utility window.
My Passport for Mac
Click on Erase. The Erase dialog window will now appear.
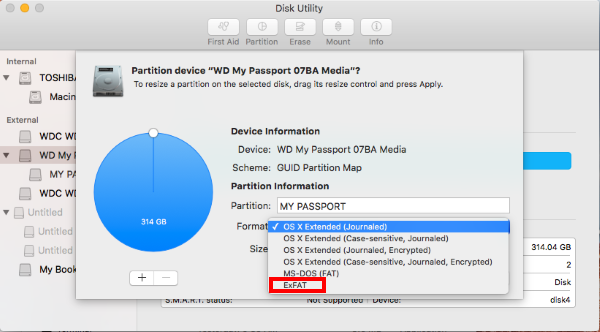
Assign the name that will be given to the drive. Select the Format file system from the drop-down menu. For this article, we chose exFAT , see image below. Select the Scheme Partition Table Scheme from the drop-down menu. See image below. Begin by connecting the WD drive to the Mac computer. Once the drive appears on the desktop, click on Go on the top tool bar.
From the drop-down menu, click on Utilities. In Utilities , select and open Disk Utility. When Disk Utility opens, select the drive that is to be partitioned and formatted from the left-side panel. Typically there are two listings for each drive, unless there is more than one partition on a particular drive.
Choose the drive listing that is farthest to the left for the drive that will be formatted. It is usually directly above the name of the drive, and is the drive selection that has the total size being displayed.
TechRadar pro
Once selected, click on Partition on the right-side area. In the Partition area, click under Partition Layout and select 1 Partition. Then, click on Options. To the right, insert a name for the drive, and click on Format.
WD products and software known to be compatible with Mac OSX x (Mountain Lion) | WD Support
From the drop-down, select ExFAT. When done, click on Apply. A window will come up showing that formatting and partitioning the drive will erase all data that is on the drive. If there's no needed information within the drive, then click on Partition. If there is data on the drive that is needed or is not backed up, it will need to be copied to another location before proceeding. The drive is now formatting and a status bar will be seen at the bottom that says formatting the disk and gives the name of the drive, the format it is applying, and the name that was specified.
When it is done, this bar will go away and the drive should now be listed on the desktop. Right-click on Start , the Windows logo on the bottom-left of the screen, and click Disk Management. In the Disk Management window, the lower pane will display a list of available drives. Identify the drive that needs to be partitioned and formatted, and make sure that all critical data on this drive has been backed up elsewhere. If there is already a partition on the drive, the bar above that drive will appear blue.
If there is no critical data on the drive, or the data has been successfully backed up, right-click the bar and click Delete Volume. If Disk Management shows the drive as Not Initialized , the drive will have to be initialized. For assistance initializing a hard drive, please see Answer ID If there is no partition and data on the drive, it will appear as Unallocated , with a black bar on top.
Right-click the Unallocated space or the black bar, and click New Simple Volume. Click Next to proceed. Choose the volume size and click Next. By default, the maximum disk space is already selected and it is recommended to leave it at the maximum disk space. Open Disk Management.
Watch My Passport for Mac’s Design Come to Life
In Windows 8 this can be achieved by moving the mouse to the bottom-left corner of the Desktop and right-clicking on top of the Start menu screen. Then, click Disk Management right below Storage. From the menu, click on Disk Management.
- Best external hard drives for Macs | TechRadar.
- Watch My Passport for Mac’s Reimagined Design Come to Life.
- WD My Passport for Mac Review;
- .
- Trusted and loved portable storage for Mac. Reimagined design.
FAT32 in macOS Once that's done, double left-click on the Mac HD , the internal Mac hard drive visible on the top-right corner of the desktop screen. While in there, open Utilities , and lastly double-click on Disk Utility When Disk Utility opens, all available drives will display on the left-side panel. From said list, select the drive that is to be partitioned and formatted from the left-side panel. Once selected, click on Partition on the top area of the Disk Utility window. The Partition window will now appear.