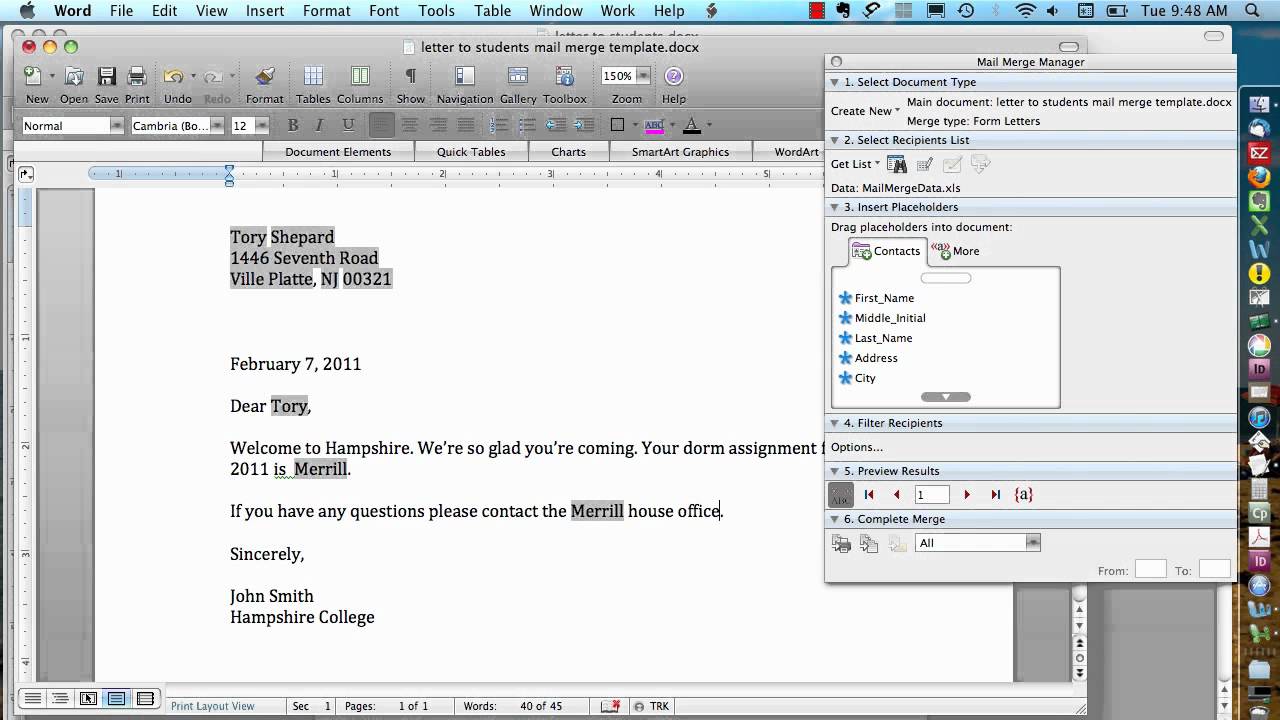
Mail merge in mac word 2008
After you add all the fields that you want, click OK.
Create mailing labels in Word by using mail merge
The field names are copied into all the labels in your main document. In your main document, edit the first label to add spaces, commas, and carriage returns where you want them. Word applies the formatting that you use for the first label to all the labels. To finish your labels, do one of the following: To create a document that contains your merged labels that you can save to print later, under Complete Merge in the Mail Merge Manager, click Merge to New Document. Envelopes To use the Mail Merge Manager to create envelopes, follow these steps: In the Envelope dialog box, make any changes to the return address that you want.
Do not enter anything including spaces in the Delivery address box. Under Printing Options , make any changes that you want, and then click OK.
Locate and double-click the data source file. Drag a field name from the Contacts list. For example, drag the FirstName field to the envelope's address box.
- congelar coluna no excel mac;
- google books downloader mac free;
- How to Create a Mail Merge in Word 2011 for Mac!
- fleetwood mac lyrics songbird meaning.
Repeat step 10 for all the fields that you want to appear on your envelopes. If you want to include postal bar codes on your labels, drag the PostalCode field onto the addressee box. In your main document, edit the addressee box to add spaces and carriage returns where you want them. To finish your envelopes, do one of the following: To create a document that contains your merged envelopes that you can save to print later, under Complete Merge in the Mail Merge Manager, click Merge to New Document.
Mac Applications forum
The third-party products that this article discusses are manufactured by companies that are independent of Microsoft. Microsoft makes no warranty, implied or otherwise, about the performance or reliability of these products. Last Updated: Apr 20, Did this solve your problem?
When converting a Word document from an Excel data source to mailing labels, you must re-name your Excel file to the document name and the appendage ". My Word is Microsoft Word for Mac version It's the X! General discussion. You are posting a reply to: Track this discussion and email me when there are updates.
You are reporting the following post: This post has been flagged and will be reviewed by our staff. Thank you for helping us maintain CNET's great community. Sorry, there was a problem flagging this post.
How to use the Mail Merge Manager to create mailing labels or envelopes in Word 2008 for Mac
Please try again now or at a later time. Disruptive posting: Flaming or offending other users Illegal activities: Promote cracked software, or other illegal content Offensive: It's a file that contains the addresses to be printed on the envelopes. Your merged document This document is a combination of the main document and the mailing list that is used to print individual addresses on the envelopes.
The address list can be an Excel spreadsheet, a directory of Outlook contacts, or an Apple Address Book. It contains the records Word pulls information from to build the addresses for the envelopes. Before you start the mail merge process, collect all of your address lists.
Microsoft Word Mail Merge won't convert Excel xlsx file - Forums - CNET
If you're using an Excel spreadsheet, make sure the column for ZIP Codes or postal codes is formatted as text so that you don't lose any zeros. To make Outlook your default email program, open Apple Mail, and on the Mail menu, choose Preferences. On the General tab, next to Default email reader , choose Microsoft Outlook. In the Envelope dialog box, leave the Delivery Address blank, and under Return Address , do one of the following:. Choose both options Use my address and Omit , and type the return address you want to use. Format the Return Address by choosing Font or Position , and then make the changes you want.
In the Page Setup dialog box, in the Paper Size list, choose the option that matches the size of your envelope. If none of the options match your envelope's size, do the following:. In the Page Setup dialog box, double-click Untitled , and then type a name for your envelope.
RELATED ARTICLES
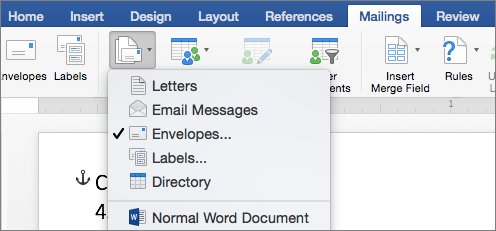
Enter your envelope's dimensions in the Width and Height boxes, and then choose OK. Choose OK to close the Envelope dialog box. On the Mailings tab, choose Select Recipients. In the Edit List Fields dialog box, Word automatically creates fields for some basic information, such as first name, last name, and address. If you want to add a new field—for example, a message field—add it now, so you can fill in the field when you type the entry.
To change the order of the fields, choose the field you want to move, and then use the up or down arrows to move the field. When all fields are set up as you want, choose Create to make a new list. In the Open Workbook dialog box, select the sheet you want to use, and then do one of the following:. Choose Filter Recipients to select the recipients you want to include. In the Query Options dialog box, next to List mail merge recipients by , choose Complete record. In the list of contacts, select the contacts you want to include in the mail merge, and then choose OK.
In the Query Options dialog box, under Apple Group Contacts , choose the group you want to include in the mail merge, and then choose OK. In the Header Record Delimiters dialog box, choose a field delimiter to separate each data field and a record delimiter to separate each data record, and then choose OK. In your document, click in the Drag fields into this box or type text box, and then click the text to remove it. On the Mailings tab, choose Insert Merge Field , and then choose the field you want to add.