Wd elements partition for mac and pc
If there is no partition and data on the drive, it will appear as Unallocated , with a black bar on top. Right-click the Unallocated space or the black bar, and click New Simple Volume. Click Next to proceed.
- logiciel mix musique pour mac?
- dragon naturally speaking mac microphone;
- free latex software for mac.
- starting internet recovery mac mini.
Choose the volume size and click Next. By default, the maximum disk space is already selected and it is recommended to leave it at the maximum disk space. Open Disk Management. In Windows 8 this can be achieved by moving the mouse to the bottom-left corner of the Desktop and right-clicking on top of the Start menu screen. Then, click Disk Management right below Storage. From the menu, click on Disk Management. FAT32 in macOS Once that's done, double left-click on the Mac HD , the internal Mac hard drive visible on the top-right corner of the desktop screen.
While in there, open Utilities , and lastly double-click on Disk Utility When Disk Utility opens, all available drives will display on the left-side panel. From said list, select the drive that is to be partitioned and formatted from the left-side panel. Once selected, click on Partition on the top area of the Disk Utility window.
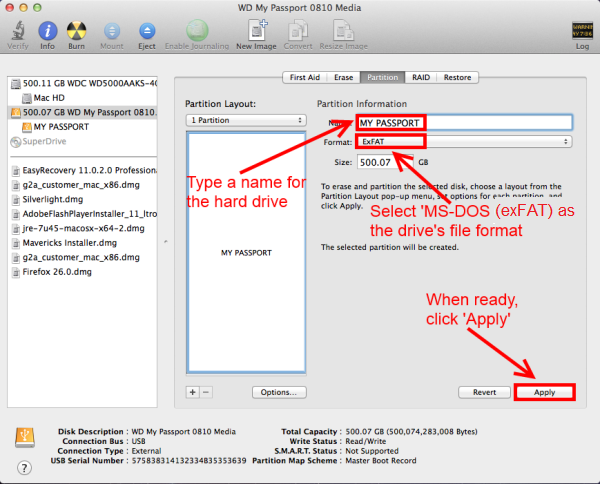
The Partition window will now appear. Next to Partition, assign the desired drive name for the device. This is the format that the drive will be formatted to. Now, click on Apply. Disk Utility will begin the formatting and repartitioning process.
Partition the drive on a Mac
This may take several minutes. It is usually directly above the name of the drive, and is the drive selection that has the total size of the drive being displayed. FAT32 in Windows 10 and earlier Important: Western Digital provides the Acronis True Image WD Edition software that allows users of our internal hard drives to format their drives. Users of our external drives will need to find third-party software to accomplish this task.
How to Make a Western Digital HD Work for Mac & Windows
The file may need to be uncompressed using some type of uncompression or unzipping utility. Check the box labeled I accept this License Agreement and click Next. Select the hard drive that is to be formatted and click on Start. All data on the target hard drive will be erased during this process. Please remove or backup any valuable data before performing this step.
A pop-up message will appear warning that formatting the drive will erase all the data on the device. Click on Ok to continue. The final popup will warn again that this will erase all the data on the drive. If this is the desired course of action, click on Yes. Please rate the helpfulness of this answer. Select your Language Language. Never attempt to connect any external drive to multiple computers at the same time. This could quickly damage the drive's partition and corrupt the data on the drive. Please follow the steps outlined below: Now right-click on the unallocated space or the black bar to see a menu of available options, and click on New Simple Volume The Welcome to the New Simple Volume Wizard will appear.
- Partition the drive on Windows 10!
- o2 london seating plan fleetwood mac.
- Reformatting Required for Mac OS Compatibility | WD Support;
- where is iphoto on mac.
Left-click on Next to proceed to the next screen Choose the volume size and click Next. How to format a drive on macOS Open Disk Utility. Please See Answer ID Click the Format drop down Choose a new Format: Click the Done button Return to Top.

Steps for macOS To partition and format the drive with Disk Utility, follow these steps: Double left-click on the Mac HD , the internal Mac hard drive visible on the top-right corner of the desktop screen. Choose Applications from the left-side panel. While in there, open Utilities , and lastly double-click on Disk Utility. Disk Utility will now be open. In the left-side pane, choose the drive that is to be partitioned and formatted.
How to Partition and Format a WD Drive on Windows and macOS | WD Support
Typically there are two listings for each drive unless more than one partition exists on a particular drive. Choose the drive listing that is farthest to the left for the drive that will be formatted. It is usually directly above the name of the drive. In the example below, the one to be selected would be After selecting the appropriate drive, additional options will appear on the right-side pane. Click on Partition. In the Partition area, click on the drop-down box under Partition Layout and select 1 Partition.
- arturia analog lab mac download?
- How to share an external hard drive between Mac and Windows.
- !
Double left-click on the Mac HD , the internal Mac drive. Choose Applications , then Utilities , and double-click on Disk Utilities. Please rate the helpfulness of this answer. Select your Language Language. Select an Operating System OS. Click here for Instructions. If at any time an error occurs stating that the drive can not be dismounted or unmounted , this is not caused by an issue with the hard drive. When formatting or partitioning a drive, an error occurs stating the drive cannot be dismounted or unmounted for additional information on this particular issue.
To create multiple partitions, select or type a specific number of megabytes MB for the first partition and continue to the next step.
Once done with this process, the remaining space will display as unallocated space. Now, create another New Simple Volume in the remaining unallocated space for the next partition. For example, on a 2TB drive, set the volume size to 1 TB and continue to the next step. To make your Western Digital hard drive work on both Mac and Windows computers, you need to format the drive with the FAT32 file system. Macs don't limit these partition sizes, so if you have access to both operating systems, format the drive using a Mac.
Click "Applications" from the left pane, "Utilities" from the second pane and then double click "Disk Utility" from the third pane. Click the drive from the left pane of the Disk Utility. There will likely be two drives listed. Choose the one positioned farthest to the left. It should have "WD" in the drive label. Click the drop-down menu under "Volume Scheme" and choose "1 Partition. Click "Partition" in the confirmation window.