Fast track c400 driver mac os x
Mark Forums Read. Page 1 of 3. Thread Tools. Join Date: Jul Location: Rome Posts: Oct Location: New Zealand Posts: Send a private message to gpaitai. Find all posts by gpaitai. JoelG Moderator. Mar Location: Canada Posts: Send a private message to JoelG. Find all posts by JoelG. Awaking Member. Nov Location: Russia Posts: Send a private message to Awaking. Find all posts by Awaking.
Send a private message to apoikos. Find all posts by apoikos. Southsidemusic Moderator. Dec Location: Stockholm - Sweden Posts: Send a private message to Southsidemusic. Visit Southsidemusic's homepage!
M-Audio FAST TRACK C400 Driver and Manual Download and Update for Windows and Mac OS
Originally Posted by Southsidemusic I wouldn't hold my breathe those old interfaces will be supported for anything over what OS was out when they were EOL'd. Originally Posted by Southsidemusic I would get a new interface that has much better converters and sound from UA or Focusrite and unfortunately say bye bye to the C if you have to update your OS. Allan23 Member. Florida Posts: Send a private message to Allan Chapter 6.
The Multi Button. Chapter 7. Recording with Fast Track C Appendix A. Appendix B. Compliance Information. Appendix C. The interface features high-quality analog and digital connectivity.
Official Representatives
Please connect directly to your computer's USB port whenever possible. Fast Track C is a 4-input. MIDI ports. Chapter 1: Welcome to Fast Track C 1. News and Events Get the latest news from Avid. For complete system requirements and a list of qualified operating systems and third-party recording applications. Products and Developers Learn about Avid products. Product Registration Register your purchase online at www. A DVD drive is required to install the drivers and software provided with this product. Important Notices include information that could affect your data or the performance of your system.
About www. Cross References point to related sections in this guide. The following are just a few of the services and features available. Avid can only assure compatibility and provide support for hardware and software it has tested and approved. User Tips are helpful hints for getting the most from your system.
Chapter 2: Fast Track C Hardware Overview 3. The green LED to the right of each button illuminates whenever the corresponding pair of outputs is active. Pad Button Each analog input channel offers a Pad button. If the red LED at the top illuminates. Turn a knob clockwise to increase the gain. If the red LED does illuminate. This is more than enough to power most modern microphones. This is a useful feature if. The LED. These meters receive signals from the Fast Track C's analog-to-digital converter and are very precise.
Fast Track C400 User Guide
Always turn off phantom power and wait at least ten seconds before connecting or disconnecting a ribbon microphone. Fast Track C can provide up to 4 mA of current per channel or up to 8 mA if only one channel is used. If you are not sure about the phantom power requirements for your microphone. Gain Controls These knobs adjust the input gain levels of their corresponding Input channels.
When using phantom power. Although phantom power can be used safely with most microphones. Volume Knob The Volume knob adjusts the output level of the analog line outputs on the back panel. Fast Track C Hardware Overview 5. Headphone Volume This knob adjusts the output level of the headphone output. Refer to the documentation provided with your recording application for further information about the available keyboard shortcuts.
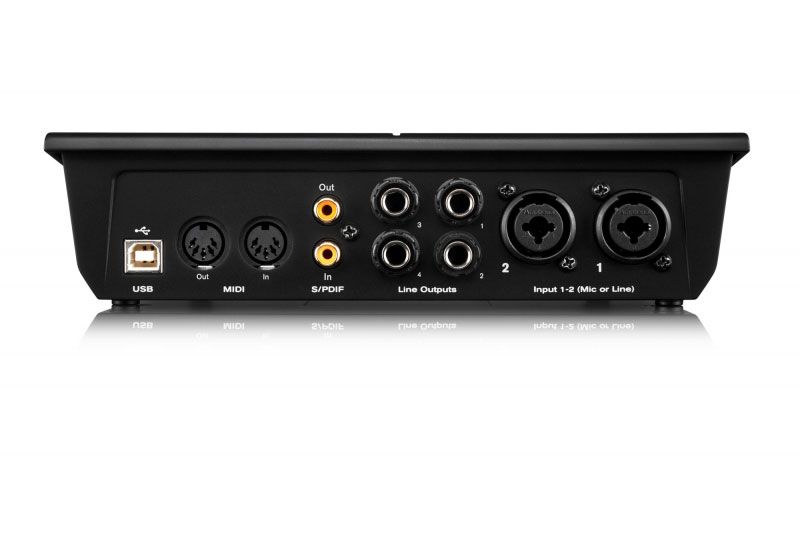
The headphone output always mirrors line outputs Toggle Marker Locations. Multi Button The Multi button can be programmed to emulate and execute up to eight different computer key commands or key combinations in your software. It can be configured to control outputs To avoid RF interference. DAT recorders. These outputs can be connected to a mixing board or directly to a monitoring system. Fast Track C Hardware Overview 7. The level for this output is controlled by the Headphone Volume knob on the top panel. Instrument Inputs Headphone Output Figure 3.
- Logic Pro Help.
- Documents Similar To Fast Track C400 User Guide;
- htc one x pc suite for mac;
The levels for these inputs is controlled by the corresponding Input Gain knobs on the top panel. Keyboard Setup Assistant from www. A Note for Mac OS If you have connected the interface to your computer. Chapter 3: Fast Track C Installation 9. If you do not have internet access. When the installation is complete. Please close the window. You may be notified that the driver being installed has not passed Windows Logo Testing. If you do not have Internet access. These outputs can be connected to any amplification system: Sleeve connectors. The volume level of the headphone signal is controlled by Headphone Volume knob on the top panel.
Hardware Connections Each Input section has three analog input jacks the Mic and Line are on a single. For information about connecting specific audio sources. This makes it easier to locate channel input connections from the front. Fast Track C has two analog input channels. When recording stereo sources. Mic For XLR microphone cables. Input selector Input 1.
This power. Dynamic microphones such as a Shure SM57 do not require phantom power to operate. Most condenser microphones such as an M-Audio Solaris require phantom power to operate. Input selector Chapter 4: This ensures that the rear input is selected. Always turn off phantom power. This will further reduce incoming levels by approximately 20 dB to prevent any distortion. This switch sends 48V to both mic inputs. DI Inputs These front-panel inputs are specifically designed for instruments such as electric guitar or electric bass.
At this point. Line Inputs Line level devices. As your sound source instrument. If your source is stereo such as a stereo keyboard or the stereo output from a mixer. While your guitar or bass is playing at its loudest levels. As your sound source is performing at its loudest levels. Input 2 Input 1 right channel left channel Fast Track C connections for line-level stereo input source Chapter 4: For example.
This means the interface is capable of handling 4 inputs and 6 outputs simultaneously. These inputs and outputs can be used in conjunction with the two analog inputs and four analog outputs of Fast Track C Please refer to your software's documentation to learn more about how to do this. To send a digital signal from the Fast Track C to an external device.
To connect your MIDI instrument for monitoring in your recording software: These additional features are available to you using the included Driver Control Panel application. The Driver Control Panel You can also open the Driver Control Panel from the Applications menu. But there are many additional parameters that cannot be accessed from the top panel.
Chapter 5: Save as. Horizontal Meters Only The Meters Only layout emphasizes pre-fader hardware input and software return metering. There are four layouts to select from: Horizontal The Horizontal layout is the default layout. The Save as button opens a file browser that lets you save the current settings of the Driver Control Panel to a Settings file. It shows all knobs. This is useful if you'd like to save various configurations so that you do not have to manually reconfigure your system each time you work on a different type of project.
The Horizontal layout is used for all the screen captures in this chapter.. The Vertical layout was designed for compact operation. Load Button The Load Button opens a file browser that lets you load a previously saved Settings file. Vertical Meters Only Additional Functions Fast Track C also features a variety of functions accessed by clicking buttons located in the upper-right area of the Control Panel: Think of Setup as a quick way to customize Fast Track C behavior.
- mac apps for home design?
- copy mac os x lion to usb.
- mac os x ipad screen sharing.
- conectar control xbox 360 mac.
- Products & Services.
Launching a supported music application when this box is left unchecked. If you wish to leave these boxes unchecked in order to allow full. This feature gives Fast Track C a great deal of flexibility in how it can be used.
- install java vm on mac.
- macOS Audio • View topic - macOS Mojave compatibility;
- El Capitain won't recognize my M-Audio C400 interface!.
- how to change desktop background on mac!
- All replies?
This will allow users to easily switch between the two sets of speakers using the output selector buttons on the top panel while still being able to control all of the speakers with one volume knob.. Unchecking one of the Master Volume Knob boxes allows its corresponding outputs to play at full volume i.
Apple Footer
In this case. Hardware Settings The parameters in this section of the Control Panel govern the operation of the interface. This is a convenient feature because all low latency monitoring is handled through your music application's mixer and there is no need to manually control settings on the Monitor Mixer in the Fast Track C Control Panel. This may result in very loud signals being sent to your speakers. If a box is checked. If you are leaving any output unchecked. If you would prefer to maintain full manual control of the Fast Track C monitor mixer.
On the other hand. Be mindful of your outgoing levels anytime you uncheck one of these boxes to avoid potentially damaging your equipment or hearing.
Fast Track C Drivers
Due to variations between computer hardware and software. Sample Rate fixed at 48kHz. The goal of setting a buffer size is to reduce it as much as possible without hearing any clicks. Internal If you are using Fast Track C by itself i. If the buffer size is too small. If the application does not provide a way to set the sample rate. In Windows Vista. Your selection in this menu is the only item that will appear in your audio application. Buffers are used to help keep audio hardware and software running smoothly by processing audio in groups of samples rather than one sample at a time.
It may be necessary to experiment with various settings until you find the best buffer size for your system. This parameter may not be editable from within the Fast Track C Control Panel if your audio application is running. When this option is selected. This menu only appears on Windows systems. You may need to stop playing audio any time you change this setting and certain applications will require you to relaunch the program before the new buffer size settings become active. Post-Fader Meters When this option is selected. This allows signal levels to be displayed regardless of the fader positions within the stereo mix in other words.
Most Mac OS X applications allow to change the buffer size from within the audio application itself. Pre-Fader Meters When this option is selected. Post-Fader Meters mean the meter indicate post-fader levels. This lets you load custom settings files with different low-latency mixer configurations without inadvertently changing the buffer size or clock source settings of the device.
This is a useful reference for understanding the path of an audio signal flowing through Fast Track C Accessing the Web Links Along the bottom-right of the Driver Control Panel you can easily access helpful online resources on our website www. Flow Clicking the Flow button opens a display showing the signal flow from the inputs to the outputs of Fast Track C Linking channels allows you to adjust mute.
The monitor mixer is set up like a standard mixing console: There are 4 input channels. Monitor Mixes The monitor mixer allows you to create two different stereo mixes from 10 input sources consisting of any of the hardware inputs 2 analog and 2 digital inputs and software returns 6 software returns.
The clip indicators can be reset by clicking on the meter itself. The monitor mixer features high-resolution meters to show input channel levels directly above each channel and main mixer output levels at the top right of the mixer. A pair of channels can be linked together by clicking the link icon between the two channels. Keep in mind that setting or adjusting a monitor mixer will not affect the signal that is recorded into your software.
Hardware Inputs 1—2 are the analog inputs. Software Returns 1 and 2 will be the default stereo output from the software. Unlike sends. Channel Faders The Channel Faders control the monitoring volume level of each channel in the monitor mix. Pan controls are unaffected by linking two channels. Links buttons Solo Each Solo button lets audio be monitored for the channel of which it is a part.