Objective c mac game tutorial
Be aware that the table view is embedded in a scroll view, so first time you click it, you will select the scroll view. In order to select the table view, click on it a second time not a double-click, but a second click a moment later. Your list does not need multiple columns, so change the Columns property to one. After removing the extra columns, the remaining column may be narrower that the table view. The next step is to configure the cell view that the table view will use. Your list needs to display the image of the Bug and its name.
You need an image and a text field in your cell to show that information. Interface Builder has a preconfigured NSTableCellView that includes an image view and a text field, so you are going to use that one.
A Scary Data Model: Organization
After doing that, your table has now two different types of cells. Remove the old cell type the cell that does not have the gear icon on the left by clicking on it and pressing the Delete Key on your keyboard. You can change the height of the cell to 32 in the Height panel. Another way to do it is dragging the bottom border of the cell until you get to the desired height. After that, the image and the text fields are a bit misaligned. To fix that, click on then and move them until they are centered in the cell. You can also resize the image view and play with the text field font to fit it to your needs.
Now you need to set the column identifier. This is a name you give to every column of the table view, so that when you want to perform some actions or you receive some notification from a column, you are able to identify the column.
Creating a Simple Maze Game for iPhone – Part 1
Now, you need to connect the table view with the MasterViewController, so that they are aware of the existence of each other. Like in iOS, the table view has two properties that are used to let the table and its controller communicate: Basically, the datasource is the class that will tell the tableview what data it needs to show.
- macOS Development for Beginners: Part 1 | agfox.com;
- how to install windows games on mac without bootcamp?
- how to download os x yosemite on mac.
- teamviewer 9 download free for mac os!
- How to Make a Simple Mac App on OS X 10.7 Tutorial: Part 1/3!
And the delegate is the one that controls how the data is displayed, and the one receives notifications from the table view, like for instance, when a cell is selected. Usually but now always the delegate and the datasource is the same controller. In this case, the datasource and the delegate will be your MasterViewController class. This can be done programmatically, but for this tutorial you are going to do that connection in Interface Builder.
Just with that you told the table view that its delegate is the MasterViewController. When you instantiate your view controller in your app, that connection will be automatically setup for us. Now, repeat the same procedure for the datasource outlet. In order to show data in a table view, you need, to implement, at least two methods. With that method, the table view knows how many rows to display, but still does not know anything about which cells to display in every row, and what information those cells should have.
That is done in tableView: This method will be called by the OS for every row and column of the table view, and there you have to create the proper cell, and fill it with the information you need. And viewForTableColumn: The difference here is that in iOS you have to setup a cell based on its section and row, and in OSX the cell setup is based on row and column. The first thing you do is getting a cellView by calling makeViewWithIdentifier:. This method will create or reuse the proper cell for a column based on the identifier which is the one you setup in Interface Builder.
Once you have the cell, is time for us to fill it with information. Well have to do it differently depending of the column. The last step is setting the cell information.
Indie Game Developer: Why I Chose Objective-C For My First Game
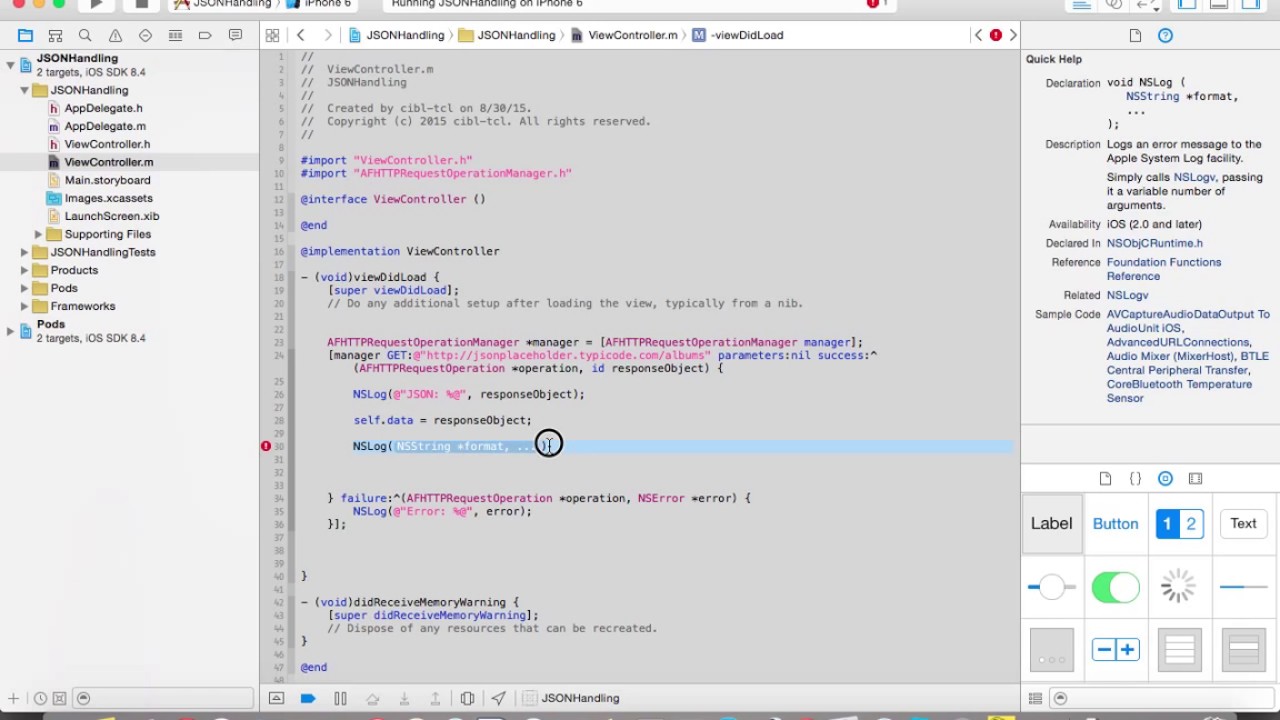
Based on the row, you get from your bugs array the proper ScaryBugDoc, and then fill the image and the text field with the name of the bug. Xcode will come to the front with the breakpoint line of code highlighted.
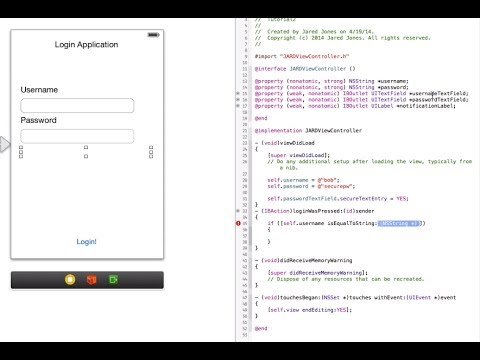
In the bottom of the Editor panel, there will now be two new sections: Variables and Console. The Variables section shows the variables used in this function as well as self — the View Controller, and sender — the button. Above the Variables display is a set of buttons for controlling the debugger. Mouse over each one and read the tooltop to see what it does.
Click the Step Over button to move to the next line. In the Variables display, you can check that name is an empty string, so click Step Over twice more. Select the name variable in the Variables display and click the Quick Look button below to see the contents. Now click the Print Description button to see the information printed in the Console. When you have checked the contents of the name variable, click the Continue program execution button to stop debugging and let the program move on.
Use the button in the top right to hide the Debug area. In addition to code and user interfaces, your app will also need some artwork. Due to the different screen types Retina and non-Retina , you often need to provide multiple versions of each asset. To simplify this process, Xcode uses Asset Libraries to store and organize the assets that accompany the app. In the Project Navigator , click on Assets.
The only item there so far is AppIcon which will contain the various images needed to display the app icon in all the required resolutions.
- Hello World!.
- objective c - Can Xcode be used to create very simple games? - Game Development Stack Exchange.
- Objective-C Programming Online Tutorial!
Click on AppIcon — you can see that it wants 10 different images to cover all the possibilities, but if you supply any one of these, Xcode will use it as best it can. This is not good practice, as you should supply all the required icon sizes, but for this tutorial one icon will be sufficient. Download the sample icon which is a x pixel image. Drag it into the Mac pt 1x box. Build and run the app to see the icon in the Dock menu. If you still see the default app icon, quit the HelloWorld app, go back to Xcode and choose Clean from the Product menu, then run the app again.
As well as being an editor, Xcode also contains all the documentation you will need for writing macOS apps. Search for NSButton. Make sure Swift is the selected language, then click the top search result so that you can read all the details about buttons and button properties. There is also a way to get to relevant documentation directly from your code.
Go back to ViewController. Option-click on the word stringValue. A popup appears with a short description. At the bottom of the popup is a link to Property Reference. Click this link and the documentation will open to show more information. Option-clicking is often a really good way to learn, and you can even add documentation to your own functions so that it shows up in the same way. The Help menu also includes Xcode Help for specific information about the Xcode environment.
In the next part of this tutorial series, you will start to create a more complicated app. Hope to see you there! If you are new to Swift, this series assumes some Swift knowledge, so first check out our Swift tutorials to get a great introduction. If you already have iOS experience, this first part of the series will be a review.
Take a quick look through the topics to make sure and then skip straight ahead to the next part of the series. To get started I used one of the provided templates then replaced most of the code. In the next dialog, name your application, be sure to select Swift as the programming language and SpriteKit as the Game Technology, click Next.
In the next dialog you select where you want to create the project and whether or not you want to create a git archive. In this case I am not, but if you are working with a team or want version controlling, allow it to create a git repository.
iOS Programming Tutorial: How To Create a Simple Maze Game
When done, click Create and your project will be created. When I run the generated project, I actually get:. Truth is though, I want to start simpler than the included project, so we are going to replace all the code anyways. The starter template seems a bit odd to me, extending behaviour that should have probably been built in in the first place. When you look at the project hierarchy Xcode has created, you will see a number of generated files.
Swift code files end with the extension. The generated project should look something like:. IBOutlet var window: IBOutlet var skView: You can completely delete the file GameScene. You can use any image you want, just be sure to update the filename in GameScene. When dropping the image file, make sure you select Copy if needed, and that the image is being put in the proper target, like so:.