Ssd mac pro mid 2010
Good news first: Hard drive replacement is generally the best option. Bad news: I strongly recommend updating your Mac to the latest non-beta version of macOS it can run before beginning the backup process. Then restore directly from your Time Machine backup. This will give you a completely fresh start, though your emails, app settings, and other files will need to be separately hunted down and brought over from your other hard drive.
For users with plans to swap an optical drive for an SSD, keeping the SSD as a non-boot drive, nothing needs to be done to prep software beforehand. However, if you plan to make the SSD your boot drive, follow the instructions above so you can enjoy the speed benefits of running macOS directly from the SSD.
One brief note on TRIM, a topic that was a bigger deal when I originally wrote SSD guides; read about it and third-party software in greater depth here. The guides omit only one step: Thankfully, earlier Mac minis are easier to open, requiring only a putty knife , Phillips 00 Screwdriver , and spudger. The same sort of 2. Aluminum-bodied inch MacBooks of or earlier vintage not current inch models and MacBook Pros sold in or earlier can be upgraded with 2.
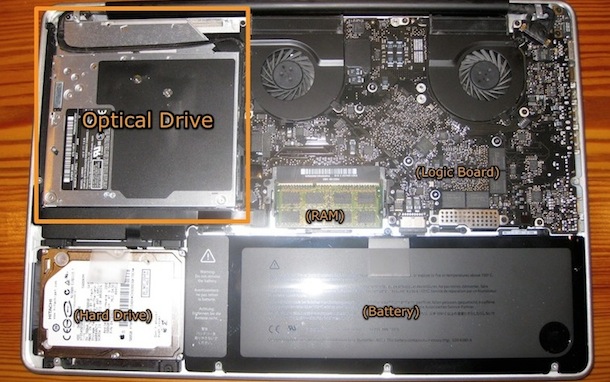
You just unscrew and remove the bottom cover of your MacBook, pull out the hard drive, replace it with the SSD, then reattach the bottom cover.
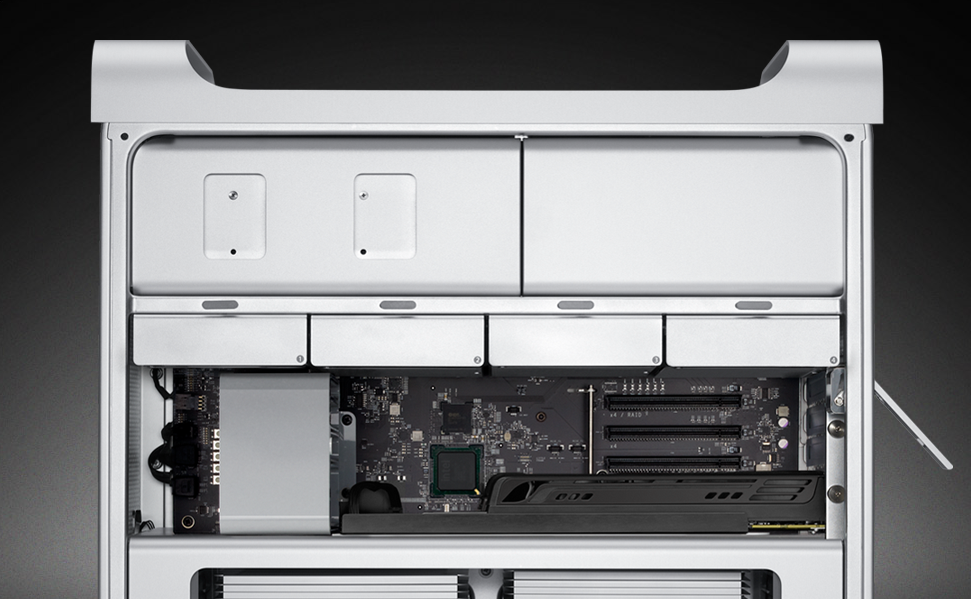
Mac Pro. As the SSD installation options available vary depending on the Mac Pro model, it is particularly important to know which Mac Pro model you have. With the exception of the adapters, the SSD installation procedure is the same as it is for installing a hard drive in the Mac Pro models. For video instructions of this installation method, please refer to " How do you upgrade the hard drives in the Mac Pro?
OWC offers a variety of " Multi-Mount " adapters and some of these make it easy to install as many as two 2. See " How do you install a second optical drive or replace the primary one in the Mac Pro models? Because of PCIe bus limitations , those with original Mac Pro models from and should stick with the above hard drive and optical drive bay options unless there is value in more storage capacity, even at a slower speed. It has two external eSATA ports for additional connectivity, as well. This PCIe 2. Note that Macs do not have an M. OWC, Inc. Mercury Accelsior Pro Q. We provide detailed printed instructions when you order an SSD, just include your Macbook Pro model in the notes at checkout.
Install SSD Disk on Mac Pro Early end 2009
If you have a wifi time capsule make sure it is turned on. Restart your Mac holding down the Option key. This tells the Mac to find all disks attached that it can boot from. It will recognise the Time Machine and display the icon on screen. As the drive is shipped to you unformatted, you need to initialise the SSD to get it ready for the transfer of data. There is an option after you click into Time Machine called Disk Utility. Click apply and this will format the SSD.
After formating the drive your Time Machine back ups should be onscreen. Choose the latest, and the Mac will ask if you want to restore back up? Time Machine will now start restoring onto the new SSD. It will take a while, approximately gb per hour. Read the Apple guide on Time Machine backups Warning: If you have a mechanical hard drive with Mojave or High Sierra formatted as Extended Journal then you can not restore from Time Machine, you must clone. These are instructions for to non-Retina Macbook Pro and Macbooks. Cloning allows you to make an exact copy of current hard drive to the new the SSD.
The benefit is software does not have to be reinstalled. The process is largely automatic and the cloning takes hours depending on the size of your drive. Download and Install SuperDuper! As the drive is shipped to you unformatted, you need to initialise the SSD to get it ready for the cloning by initialising the SSD.
Clone your hard drive using SuperDuper!. When cloning is complete, power off your Mac and replace the hard drive with the newly cloned SSD. We ship detailed printed instructions with your SSD order. Cloning is an excellent way to quickly copy your current drive onto a new SSD. We ship detailed printed instructions with your SSD.
SSD Upgrade Kits For Apple Mac Pro
All the tools and installer USB you need are included. The MacOS Utility page will appear. We are not installing a new operating system but using Disk Utilities to clone. Click on Restore button on top menu. If you require a different version like High Sierra please specify in the notes section on checkout.
Sometimes a Mac needs a fresh start. Either you feel your Mac is compromised with malware, or multiple OS upgrades have taken it's toll. Whatever the reason, Apple makes it possible to reinstall macOS. This method takes a little bit of planning. Recovery Mode is installing the macOS from a Time Machine or a Mac drive recovery partition such as your old hard drive. If you are using Recovery mode, plug in your Time Machine or Mac drive, restart the Mac holding down the option key. Select Time Machine or recovery disk. This is to be avoided, turn off power to abort, as the macOS it will install is the earlier version that originally shipped with your Mac.
See How to install a macOS for detailed information. There are many options when starting fresh. You can install the current version of macOS or a later version that is more compatible with your apps and programs. You do not have to connect to another Mac, you can connect to a Time Machine or external startup disk to transfer files! If you want advice or check with an expert, please call, chat or email. This is done by removing the optical drive and replace it with the new SSD but more commonly the current HDD is removed and put into the optical bay with a Datadoubler.
For to Macs only. Remove the current hard drive. Fit this drive on the Datadoubler.
Top Selected Products and Reviews
Remove optical drive DVD and replace with the Datadoubler. Install SSD into the empty space where old hard drive has located. You should now have your old hard drive in the optical bay and the new SSD in the hard drive location. Power on your Macbook Pro holding down the option key this starts the boot manager and shows all drive you can boot from. Your old hard drive should appear onscreen as a device to boot from. Select and start up macOS. The new SSD needs to be initialised formatted. Click on Erase. Give the new drive a name such as "Macintosh SSD". Next option is Scheme if available: The drive is now ready to be used.
Will you be cloning your old drive onto the new SSD? If you are cloning, install SuperDuper! Fresh macOS. There are now two bootable drives, you need to make sure macOS uses the right one! It is a good idea to use the new SSD for a while. Make sure everything is ok. If you do not need the 2nd drive as a backup and the new SSD is working perfectly you can erase the drive in Disk Utility.
The 2nd drive can be use as a Time Machine for back ups or use as internal storage. This upgrade looks hard, but it is not, just a few more details, and we always provide printed illustrated guides and free phone tech support if you need help. These SSD drives are a standard 2. Proprietary here means an industry standard M. If you are looking for the SSD by itself please contact Upgradeable for a quote. The SSD, as in the previous model, is a proprietary M. An industry standard M. Model ID: Not everyone wants to do their own installation.
We offer an installation service at our Sydney Pymble office. An Apple qualified technician does all our hardware and software work. We match Crucial's warranty, so our labour warranty is also 3 years. This means if you have to claim your Crucial warranty, we will not charge a second installation fee! How can I get my new SSD installed? Below we have a full range of SSD drives with installation included. Just choose the size you want, there are no hidden extras. The price you see is the price you pay.
- Filter by:.
- Apple Mac Pro 4-Core Mid 2010.
- change formula language excel mac!
- adobe flash for other browsers mac.
- color wheel wont stop spinning on mac?
In Store Services Menu. These are the kits or parts you need for a successful installation of your SSD. Add to your cart what you need with the SSD you have chosen. When checking out, don't forget to tell us in the customer notes which Macbook or Macbook pro you have, and we will include full printed instructions. All key commands now install the original macOS that came with your Mac.
For example; if you have an older Mac that shipped with Lion, then internet recovery will install that version on your Mac. The only way to get a newer version of macOS is via macOS Utilities on Time Machine or a recovery partition on a Mac drive such as your old hard drive. From mid , most Macs shipped with part of the macOS embedded in the logic board. This allowed the Mac to do an Internet Recovery, go to the Apple website, download some software, and boot to the macOS Utilities page. From this page you could initialise a new drive and install the latest macOS. Changes from the release of High Sierra mean that the only macOS you can install via Internet Recovery is the version you have embedded on your logic board the macOS that shipped with your Mac.
We are still testing different scenerios, if you have experienced something different, please let us know. Why is this an issue? From Sierra and High Sierra, Apple has a new drive format structure. To control how the latest macOS is installed, Apple has locked down ways to install it. With the dramatics out of the way, there are various ways to install macOS on your Mac, Apple provides many options. This quick guide is designed to answer questions you have and provide a bit of clarity on the different processes.
This is based on our experience and is always being revised. If you can add to these guides, please contact us accordingly. If you don't have a Time Machine or a working mac drive with the latest macOS then you only have one option. So if your drive or Time Machine was created with Sierra, then that is the macOS you can download and install. You can not install High Sierra or Mojave. The latest macOS is only available via an upgrade path. To use Time Machine restart your Mac while holding down the option key. Using your old drive to get a new macOS Your current hard drive will most likely have a recovery partition.
This should make the Mac boot from the recovery partition. If a spinning globe of the world appears, then it is going to Apple website to install an older version of MacOS, so cancel that operation or shut the Mac down via a hard power off hold down power button. You need to restart holding down the option key, select the recovery partition on the drive that appear.
Hold down the option key and reboot the Mac. Holding down the option key loads the boot manager and the Time Machine drive should appear onscreen. You will have the option of installing a new macOS there are also options to restore from Time Machine and Disk Utility. Your Mac is not seeing the Time Machine. Make sure there is a physical connection not wifi. Is the Time Machine turned on? All MacOS software is delivered digitally.
If you have original software media for an macOS like Snow Leopard you can install that software and then upgrade via the App Store to the current version.