
Disc utility mac erase free space
Learn More.
We use cookies on our website to personalize your experience, like showing you prices in your local currency, or learning which parts of our site people use the most. By using our site you accept our use of cookies. Wiping Free Disk Space When you delete a file, OS X removes the reference to that file, but doesn't delete the actual data that made up the file on your hard drive.
Wiping free space can take several hours. To wipe your drive using Erase Freespace: Click Tools, and then click Erase Free Space.
agfox.com - Wiping Free Disk Space
I figure if a government wants to hack my personal info, there are a zillion other avenues they would be more successful in hacking than a 3-pass-erasure of a secondhand SSD or hard drive that had encrypted personal data. In diskutil you have still Security Options in the Erase dialog. There is a slider from Fastest to Most Secure. Whatever that means. It erases your files and writes over the data 7 times. That should be enough.
- mac os 9 classic software?
- Wiping Free Disk Space?
- league of legends wont launch mac.
- microsoft office for mac 2008 trial download free.
- How to Securely Erase Data from Your Mac and External Drives;
- an error occurred during activation. try again. imessage mac.
True; in this case you can't erase just the remaining free space, though—that only allows doing the writes over the entire disk. But I didn't realize the options were still there for full erase, thanks! How to securely erase free space on a hard drive Mac. Make sure the volume you wish to erase is selected, then use the Erase button in the toolbar to begin the erase process.
- paradise bakery nutrition mac and cheese?
- ipsec remote access vpn client mac.
- copiadores de dvd para mac.
- Apple Footer.
- How to Securely Erase Data from Your Mac and External Drives | The Mac Security Blog.
- block pop ups on mac chrome.
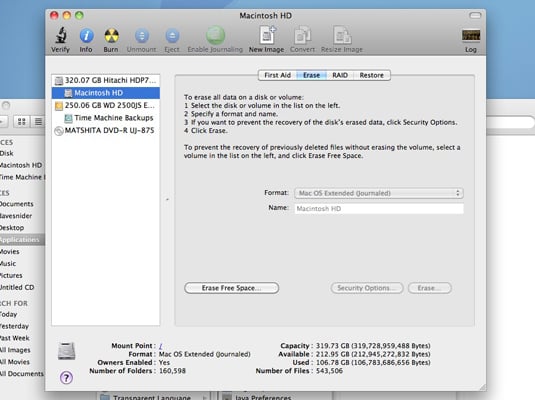
In the sidebar, select the volume you wish to erase. With the volume you wish to erase selected, click on the Erase button in the Disk Utility toolbar, or select Erase from the Edit menu. The erase sheet will change to display a progress bar.
All replies
When the erase has finished, click the Done button. But before you make use of the Security Options, make sure the volume being erased is part of a hard drive and not a fusion drive or an SSD. The Erase Security Options feature lets you pick the number of write passes that are made on the selected volume. If the volume you wish to erase is part of a hard drive, follow the steps outlined in Erasing a Volume: The Basics, above, until the erase sheet is shown.
How to Secure Erase Free Space on Mac Drives with OS X El Capitan
At this point, click the Security Options button. The Security Options sheet will be displayed, showing a slider you can use to select one of four methods to erase the selected drive. The Fastest method is the same as the standard erase, and performs no special function to ensure any level of security. Picking this option will result in the volume being erased, but data can be recovered with basic data recovery apps.
Further reading
Moving the slider one click towards the right will produce the first secure erase, which writes a pass of random data followed by a pass of all zeros across the selected volume. This two-pass write method will keep most individuals with prying eyes using conventional data recovery techniques from being able to access your old information.
The next security option produces a DOE-compliant three-pass secure erase. It uses two passes of random data followed by a third pass using a predefined data pattern.
Erase Free Space on a Mac Hard Drive with OS X Disk Utility to Prevent File Recovery
Using this method should secure your old data against most individuals, businesses, and governments not willing to spend excess money or time to uncover your data. The last and most secure option is a seven-pass erasure that meets DOD M standards for a secure wipe of magnetic media. As you advance the slider to more secure options, you also substantially increase the time it takes to perform the erase. Make sure you really need this level of security before proceeding. By their physical nature, SSDs are inherently secure after a basic erase process.
The reason for this has to do with the internal architecture, logical to physical cell mapping, and wear leveling. Once the logical to physical map is removed, which occurs during a standard erase, accessing the internal data would just produce a hodge-podge of data that would be nearly impossible to decipher. Erasing a volume by changing the format to include encryption, followed up by a second standard erase, will create a nicely sanitized volume with little chance of data recovery. A better and much faster method to produce a sanitized SSD volume is to encrypt the data on the drive, and then erase it, removing the stored encryption key along with everything else.