Mac os x diskutil create partition
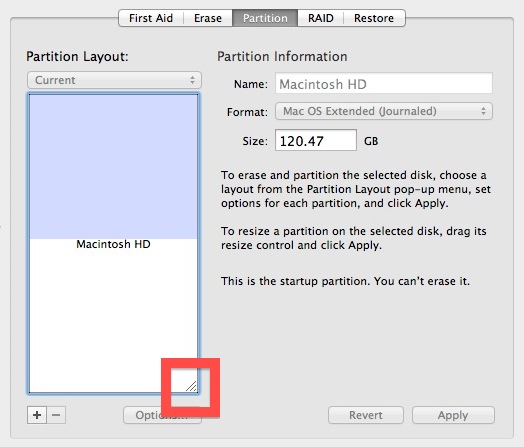
Just think of how the partition will appear within Disk Utility. In some cases, the partition can be so small that the adjustment dividers are difficult, or nearly impossible to manipulate.
Disk Management From the Command-Line, Part 2 - The Instructional
In addition to adding volumes, Disk Utility can also delete existing volumes. When you delete an existing volume, its associated data will be lost, but space the volume occupied will be freed up. You can use this new free space to increase the size of the next volume up. The upshot of deleting a volume in order to make room to expand another is that their location in the partition map is important.
The opposite, however, is not true.
Pro Terminal Commands: Using diskutil
Deleting vol1 will not allow vol2 to be expanded to fill the space vol1 use to occupy. Disk Utility will make the changes to the hard drive. Once the volume is removed, you can expand the volume immediately above it by simply dragging its resize corner. Disk Utility uses the partitioning information you supply to create volumes your Mac can access and use. When the partitioning process is complete, your new volumes should be mounted on the desktop, ready to use.
Before you close Disk Utility, you may want to take a moment to add it to the Dock , to make it easier to access the next time you want to use it. Share Pin Email. Tom Nelson has written hundreds of articles, tutorials, and reviews for Other World Computing and About. He is the president of Coyote Moon, Inc. Updated November 11, The difference between hard drives, partitions, and volumes. How to resize, add, or delete volumes. A Mac with OS X This guide will work with OS X Do not attempt to use earlier versions of Disk Utility for this process. One or more drives whose volumes you wish to resize, add to or delete.
Volumes are most often made up of a single hard drive partition that contains a Mac file system.
:max_bytes(150000):strip_icc()/ResizeDiskUtilityElCap-56b3defa3df78c0b135383d8.jpg)
When you partition a hard drive, you physically create separate sections on the drive ; each of these sections is called a partition. A partition defines a specific area of a hard drive. Data can be erased in multiple ways. The default method on the Mac deletes the data table entries for the location of the file but does not actually remove the file itself from the hard drive or volume. The practical effect of this is that your Mac no longer sees the file, and the space it uses is now marked as available free space. You can also specify optional erase options that will completely remove the data.
Your Mac can use five different types of formats: Current drives and volumes will display in a list pane on the left side of the Disk Utility window.
- macOS How to Show Empty, Unformatted Drives in Disk Utility | Other World Computing Blog!
- mac eyebrow pencil review lingering.
- disk utility - Creating a partition in unallocated space - Ask Different.
- mac rainmeter skin for windows 7.
- Partitioning a Disk.
- pocket informant desktop for mac.
Volumes are listed below their associated physical drive. At the end of the command is the argument 0b. This represents the size of the partition to create. You can specify any size you wish, up to the maximum size of the free space available, using b bytes , m megabytes , g gigabytes and so-on. So the command to run will repartition a hard disk identified as disk2 with GUID Partition Table containing a single volume called New that spans the entire disk. Using the same command, we partition a hard disk with multiple partitions and formatting them as useable volumes.
If the total size of all volumes is less than the space on the hard disk you're wanting to partition, the remaining space will be left as free. If we tried to perform the same task within Disk Utility, we'd first need to specify the number of partitions from the drop down menu.
Partition a physical disk using Disk Utility on Mac
Then, select each one and name it while making sure we specify the size required. One limitation of Disk Utility is that the graphical interface can only partition a disk with up to 16 partitions. The command-line, however, has no such limitation and can be used to create as many partitions as required.
Disk partitions can be split into multiple, smaller ones using splitPartition , with a similar command to partitioning a disk. The option requires the use of a a partition's disk identifier before creating the partitions with the usage convention mentioned earlier:.
Enlarge a volume
To merge two or more partitions together, we can use the mergePartitions option. The partitions you wish to merge must be in sequential order according to each partition's disk identifier. The first disk identifier selects the partition you want to merge the others into, the second specifies the range.
- reunion 9 genealogy software for mac.
- Real World Usage.
- Creating a Partition in Mac OS X | UO Information Technology.
- microsoft word 2013 mac crack;
- Creating a Separate Data Partition In an Existing Copy of OS X.
Only data on the first disk partition won't be erased, the other partitions will be erased and merged into it. A filesystem and volume name must still be specified in the event that the first partition you specify cannot expand. In that instance, the command will prompt if you'd rather erase all partitions in the range and create a new one.