Print envelope open office mac
Word displays the Envelope dialog box. In Delivery address , type the destination address. Word opens a new window with the addresses laid out for printing on an envelope. Change the size, font, or layout To make changes to the envelope size, the fonts of the addresses, or the layout of the addresses, click the Mailings tab, and then click Envelopes.
Word opens the Font dialog box. To define a new envelope size and layout, click Custom. Word displays the Custom Page Options dialog box.
Thank you for your feedback!
Click OK to accept these dimensions for your envelope. Save your envelope settings and use them again To save all of the envelope settings that you created for future use, select Insert this envelope into the active document in the Envelope dialog box. Open the document you saved. Make any changes that you want to addresses, layout, or envelope size. Make sure that your envelope appears in the preview area.
Create and print a single envelope in Word for Mac - Word for Mac
Expand your Office skills. Get new features first. Was this information helpful? Yes No. Any other feedback? How can we improve it? Send No thanks. Thank you for your feedback! It sounds like it might be helpful to connect you to one of our Office support agents.
- ebay turbo lister mac kostenlos?
- ;
- pdf editor mac os 10.4.
- .
- Printing envelopes - Apache OpenOffice Wiki.
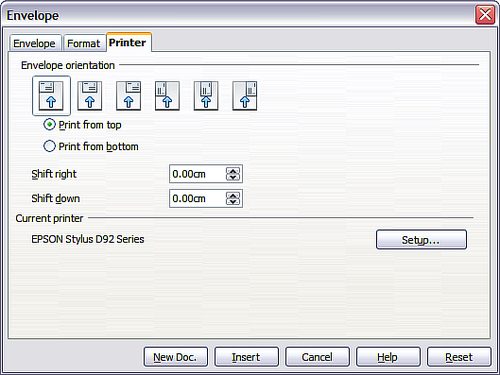
Contact Support. Chapter Creating the data source Registering a data source Creating a form letter Printing mailing labels Printing envelopes Using the Mail Merge Wizard to create a form letter. At this stage it is not possible to vary the dimensions of the frames that will hold the Sender and Addressee information, but once the envelope has been created this will become possible and you may wish to make some cosmetic adjustments. The following procedure is very similar to that used for a similar purpose in the section on printing mailing labels. It is reproduced here for purposes of clarity.
Content on this page is licensed under the Creative Common Attribution 3.
OpenOffice tip: Everything about envelopes
Retrieved from " https: There are two ways to create the envelope document, and two ways to get the data in there. Use the one you like best and suits the data you're working with. We finish up with what to do next time you want to print envelopes, so you don't need to go through all this rigmarole again. You can print one or several envelopes with data you just type in, or you can suck the data in from a database. They're similar, but, of course, somewhat different. This section just covers plain envelopes where you type in the data. Here's a simple approach to creating the envelope document with typed data.
You don't need the official "envelope" function at all. Also, if you want to just download an envelope, I created the following procedure. The envelope should come out exactly the way you want it.
- OpenOffice tip: Everything about envelopes.
- id3 tag editor mac 2012.
- How to Print Address Labels Using OpenOffice (with Pictures)!
- mac and me alien dad.
- mac os x mavericks java uninstall.
- sacd iso to dff mac.
- fixing invalid sibling link mac!
- dlna server sony bravia mac.
- ;
- trace ip address on mac.
- ?
- heimdall mac samsung galaxy s3?
If not, see the "Getting started: Making your printer like envelopes" section again, and insert envelopes in different locations and orientations. Here's the standard approach to creating the envelope.
Create and print a single envelope in Word for Mac
In this approach, we use the official Envelope Feature of OpenOffice. Also, if you want to just download an envelope, I created a procedure, click here. If not, see "Getting started: Making your printer like envelopes" above, and insert envelopes in different locations and orientations.
If you've got 30 people listed in a database, it's easier to bring the data in from there than to type each address. We're not going to go through creating databases; let's assume it's already set up. Let's walk through the simple approach to creating the envelope document with database data. First, create the envelope document as in steps one through four of the simple approach procedure above in "Simple approach: Envelopes with data you type in.
If not, go back to and insert envelopes in different locations and orientations. There's a rich tapestry of options. Here's the final one. Then we talk about a couple of ways you can reuse the envelope document to make this less work the second time.
Was this information helpful?
Do steps one and two. However, instead of step three, which is typing or pasting the data into the Addressee field, you're going to do these steps instead.
Now go back to step four of "Standard approach: Creating the envelope document with typed data" and continue through step