Desenvolver para android no mac
Learn how Swift makes programming easier, more flexible, and more fun. Xcode is the Mac app used to build every other Mac app and every iOS app, too. It has all the tools you need to create an amazing app experience.
Get started with Swift.
Get detailed technical information and an advanced overview of Swift. Check out the developer blog and stay up to date on the latest news. And enjoy free access to great resources like guides, videos, and sample code. Developers are doing great things with Swift. A beautiful app using Swift.
- Opiniões sobre Android Studio!
- my mac is slow playing videos.
- free download itunes 7.2 for mac.
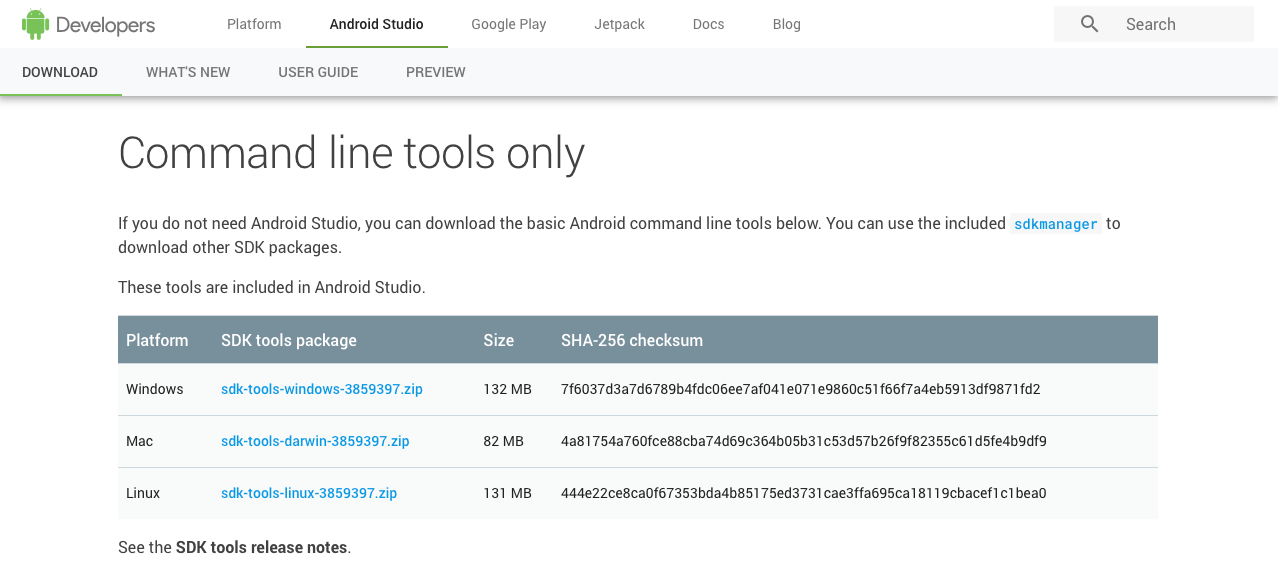
- Ionic Resources | OSX Platform Setup.
Great apps built using Swift. LinkedIn Kickstarter Eventbrite Hipmunk. Better performance equals better apps. Up to 2. Up to 8.
Swift. A powerful open language that lets everyone build amazing apps.
Educators are adding Swift to their curriculum. Swift is everywhere. Mac supported macOS To target macOS When the button is clicked, the label will display the number of times it has been clicked. Click on the New Project Click Next:. Visual Studio for Mac will create the new Xamarin. Mac app and display the default files that get added to the app's solution:. A solution is a container that can hold one or more projects; projects can include applications, supporting libraries, test applications, etc.
Mac application programming is very similar to working with Xamarin. The following sections, will take a quick look through some of these files. The Main. It contains a static Main method which creates a new Xamarin. Mac app instance and passes the name of the class that will handle OS events, which in this case is the AppDelegate class:. The AppDelegate. The WillTerminate method will be called when the user or the system has instantiated a shutdown of the app. The developer should use this method to finalize the app before it quits such as saving user preferences or window size and location.
Requirements
The ViewController declaration represents the object that controls the actual app window. The controller is responsible for the life cycle of the main window. This will be examined in detail later, for now take a quick look at it:. The designer file for the Main Window class is initially empty, but it will be automatically populated by Visual Studio for Mac as the user interface is created with Xcode Interface Builder:.
With the Xamarin. Mac app project created and a basic understanding of its components, switch to Xcode to create the user interface using Interface Builder. The Info. Mac app such as its Name and Bundle Identifier:. It also defines the Storyboard that will be used to display the user interface for the Xamarin.
Mac app under the Main Interface dropdown. In example above, Main in the dropdown relates to the Main. It also defines the app's icons by specifying the Asset Catalog that contains them AppIcon in this case. The app's Entitlements. Mac app has such as Sandboxing and iCloud:.
For the Hello World example, no entitlements will be required. The next section shows how to use Xcode's Interface Builder to edit the Main. Mac app's UI. As part of Xcode, Apple has created a tool called Interface Builder, which allows a developer to create a user interface visually in a designer. To get started, double-click the Main.
Before starting to design the interface, take a quick overview of Xcode to orient with the main features that will be used. The developer doesn't have to use Xcode and Interface Builder to create the user interface for a Xamarin. Mac app, the UI can be created directly from C code but that is beyond the scope of this article. For the sake of simplicity, it will be using Interface Builder to create the user interface throughout the rest of this tutorial.
When opening a. The following sections take a look at what each of these Xcode features do and how to use them to create the interface for a Xamarin. Mac app. Later, when the developer switches back to Visual Studio for Mac from Xcode, any changes made to this project are synchronized with the Xamarin. Mac project by Visual Studio for Mac. The Project Navigation section allows the developer to navigate between all of the files that make up this shim Xcode project. Typically, they will only be interested in the.
The Interface Hierarchy section allows the developer to easily access several key properties of the user interface such as its Placeholders and main Window. This section can be used to access the individual elements views that make up the user interface and to adjust the way they are nested by dragging them around within the hierarchy. The Interface Editor section provides the surface on which the user interface is graphically laid out.
As user interface elements views are added to the design surface, they will be added to the Interface Hierarchy section in the order that they appear in the Interface Editor. Initially this section is almost empty, however if the developer selects an element in the Interface Editor or Interface Hierarchy , the Properties section will be populated with information about the given element and properties that they can adjust. Within the Properties section, there are eight different Inspector Tabs , as shown in the following illustration:. Use the Library section to find controls and objects to place into the designer to graphically build the user interface:.
With the basics of the Xcode IDE and Interface Builder covered, the developer can create the user interface for the main view. Drop the label onto the Window beside the button in the Interface Editor:. Select the Button just added in the Interface Editor , and click the Constraints Editor icon at the bottom of the window:. At the top of the editor, click the Red I-Beams at the top and left. As the window is resized, this will keep the button in the same location at the top left corner of the screen. Next, check the Height and Width boxes and use the default sizes.
This keeps the button at the same size when the window resizes. By clicking Red I-Beams at the top, right and left of the Constraints Editor , tells the label to be stuck to its given X and Y locations and to grow and shrink as the window is resized in the running application. Again, check the Height box and use the default size, then click the Add 4 Constraints button to add the constraints and close the editor. While resizing and moving controls around, notice that Interface Builder gives helpful snap hints that are based on macOS Human Interface Guidelines.
Hello, Mac – Walkthrough - Xamarin | Microsoft Docs
These guidelines will help the developer to create high quality apps that will have a familiar look and feel for Mac users. Look in the Interface Hierarchy section to see how the layout and hierarchy of the elements that make up the user interface are shown:.
From here the developer can select items to edit or drag to reorder UI elements if needed. For example, if a UI element was being covered by another element, they could drag it to the bottom of the list to make it the top-most item on the window. With the user interface created, the developer will need to expose the UI items so that Xamarin.
Mac can access and interact with them in C code. The next section, Outlets and Actions , shows how to do this. So what are Outlets and Actions? In traditional. The developer must explicitly expose the UI element to code. In order do this, Apple provides two options:. In Xcode, Outlets and Actions are added directly in code via Control-dragging. More specifically, this means that to create an Outlet or Action , the developer will choose a control element to add an Outlet or Action to, hold down the Control key on the keyboard, and drag that control directly into the code.
For Xamarin. Mac developers, this means that the developer will drag into the Objective-C stub files that correspond to the C file where they want to create the Outlet or Action. Visual Studio for Mac created a file called ViewController. This stub. Mac project when a new NSWindow is created. This file will be used to synchronize the changes made by Interface Builder and is where the Outlets and Actions are created so that UI elements are exposed to C code.
With a basic understanding of what Outlets and Actions are, create an Outlet to expose the Label created to our C code. In Xcode at the far right top-hand corner of the screen, click the Double Circle button to open the Assistant Editor:. The Xcode will switch to a split-view mode with the Interface Editor on one side and a Code Editor on the other. Notice that Xcode has automatically picked the ViewController. From the discussion on what Outlets and Actions are above, the developer will need to have the ViewController.