Wugs galaxy nexus root toolkit for mac
Next, you'll need to unlock the bootloader on your Nexus to enable manual updating if you haven't already done so. Plug your device into your computer with a USB data cable, then open a command window in the platform-tools folder inside of your ADB installation directory and enter the following command if you're using a Windows or Linux machine:.
Development
If you're using a Mac, it's essentially the same command, but with a period and slash at the beginning:. Once you've done that, your Nexus will boot into bootloader mode, which is a black screen with green and white text. To unlock your bootloader, enter the following command, and remember to add ". At this point, you'll see a menu on your device asking if you'd like to unlock the bootloader. Press the volume up button once to highlight "Yes," then press the power button to confirm your choice.
The process will take up to a few minutes, so wait until it's finished before proceeding to the next step.
At this point, you're ready to install the latest Android version. With the terminal window still open, enter the following command to install the factory images, remembering to add ". This should automatically flash all of the factory images onto your Nexus device, and the process should take 5 to 10 minutes. If you experience any issues with the flash-all script or a "missing boot. To do that, extract the last remaining ZIP archive from the initial factory image file and make sure its contents are all stored in the platform-tools folder.
When you're done there, enter the following commands, one by one, remembering to add ". At this point, your Nexus device should automatically reboot, and you'll be running the latest version of Android. The first boot will take longer than normal, but if it hangs up on the boot animation for more than 5 minutes, simply unplug the phone or tablet from your computer, then press and hold the device's power button to force a reboot.
Hmmm I'm not seeing any of them that look similar to the widget in this picture https: Yep, it'll work regardless of how you rooted your phone. Your second question's a bit more complicated to answer. If you already unlocked your bootloader, it's possible to update this way without losing data. You can tell if your bootloader is unlocked by restarting your phone—if it has a screen that says "Your software can't be checked for corruption" and shows a small "unlocked" icon during bootup, your bootloader's unlocked.
Driver Installation
So if that's the case, you can skip Step 5 altogether since it's already unlocked. Then, when you get to Step 6, don't do the "flash-all" command. Instead, do the alternative method outlined there where you extract all the individual images. But then, just skip the "fastboot flash userdata [userdata file name]. That's the one that overwrites your existing data, so if you don't flash it, your data will remain intact.
Other than that, just run the rest of those commands in the bullet-point list near the bottom, and you'll be fully updated. You'd have to re-root when you're done, but that's unavoidable. I have a question: Method 1: Method 2: Step 1: Step 2: Download the Newest Factory Images Next up, you'll have to download the latest factory images package.
Rooting your Nexus 5 Instructions (Mac and Windows Instructions)
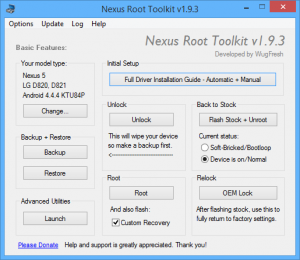
Here's where anxiety would normally set in for those who are intimidated by the root process. Fear not, the Galaxy Nexus root toolkit will hold your hand and guide you step by step until you have successfully unlocked the bootloader and rooted your Galaxy Nexus.
You will be presented with instructions and information on each screen alerting you of what you need to do, as well as what is actually being done to the device. Follow the instructions closely, and make sure you actually take the time to read through them. Most of all, be patient. When you are told to wait for the device to boot, wait.
We were able to unlock the bootloader without issue in a relatively short time, but we did run into some trouble during the rooting process. While attempting to reboot into recovery mode, the Galaxy Nexus would start to reboot and then display the dreaded triangle and exclamation point icon.
How to easily root your Galaxy Nexus - CNET
Unplugging the Galaxy Nexus from the computer, closing out the root toolkit program, doing a battery pull on the device, and starting over cleared the issue right up. You don't need to worry if you are already unlocked but not rooted; the toolkit will recognize your device's unlocked state and skip right to the rooting process.
Again, follow the prompts there are only a couple this time and you will have a clean install of Android 4.
Anytime you mess around with files at the system level, there's a chance things can go astray. It's a great idea to educate yourself on the root process before attempting to root, so you know where to begin troubleshooting any issues. Android Central. How to set up Google's two-step verification: To better protect your digital life, specifically your Google account, turn on two-factor authentication for your Gmail account.
- open source audio editor for mac.
- How To Install KDE Plasma Mobile Linux On Nexus 5 And 5X?
- Share your voice.
- beyluxe free download for mac.
- Root, Unroot & Unlock Nexus 7 () & All Other Nexus Devices With Wug's Toolkit;
- Root, Unroot & Unlock Nexus 7 (2013) & All Other Nexus Devices With Wug’s Toolkit.
With a few minutes of setup time, your account will be much more secure -- with very little hassle. How to book an Uber or Lyft with Google Home: Use a Google Home and your phone to get the best ride. Be respectful, keep it civil and stay on topic.