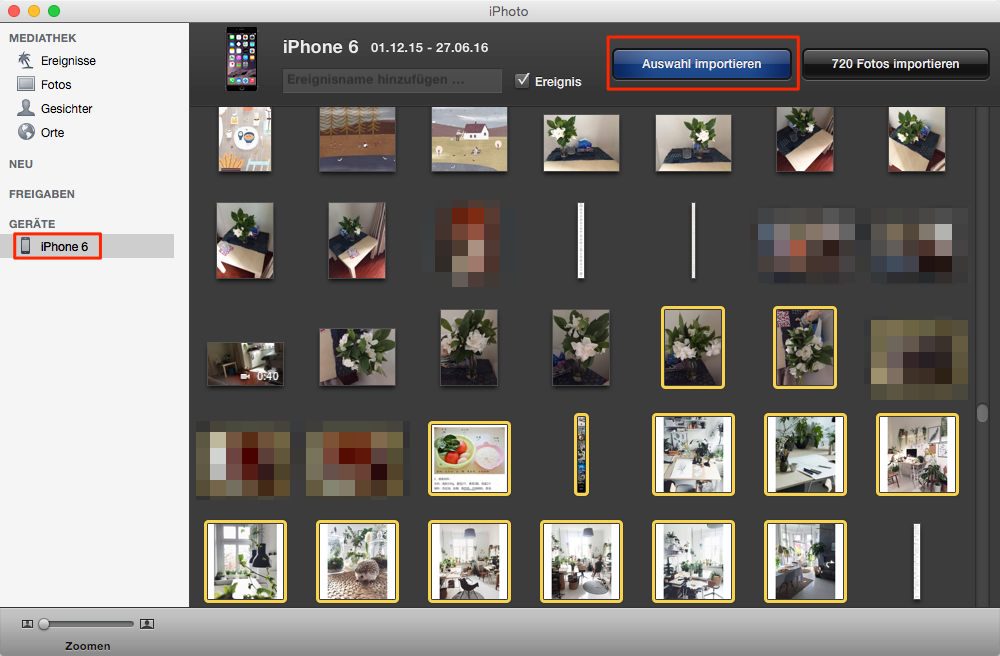
Bilder von iphone auf mac iphoto
Tap Albums. You'll find this in the lower-right corner of the Photos app. If your Photos app opens to an "Albums" page, skip this step. If your Photos app opens to a list of photos, tap the "Back" button in the upper-left corner of the screen and then skip to the next step. Tap Camera Roll. It should be the top option on this page. This will open a list of photos on your iPhone. Tap Select. It's in the top-right corner of the screen. Select photos. Tap each photo that you want to move onto your Mac.
You should see a blue-and-white checkmark icon appear in the corner of each selected photo. Tap "Share".
Export photos in their original format
Tap the "AirDrop" icon. This icon resembles a series of concentric circles near the top of the "Share" menu. Tap your Mac's name. It's in the AirDrop menu.
Photos for macOS
Doing so will push the photos into your Mac's "Downloads" folder, which can be accessed by clicking Downloads on the left side of the Finder window. If your Mac doesn't use the same Apple ID account as your iPhone, you'll have to confirm the photo transfer on your Mac when prompted. Method 3. Make sure that you have enough space.
This method allows you to upload all of your photos to iCloud, at which point you can download them onto any computer with Internet access; however, your iCloud storage must exceed the amount of storage that your photos take up. You start with 5 gigabytes of free storage, but you may need to upgrade your storage before you can store your photos. Open your iPhone's. Tap your Apple ID. It's at the top of the Settings page. Tap iCloud.
This is near the middle of the screen. Tap Photos. Tap the white "iCloud Photo Library" switch. Open your Mac's Apple menu. Click System Preferences…. It's near the top of the drop-down menu. This will open the System Preferences window. Click Options. It's to the right of the "Photos" heading near the top of the page. A new window will open. Enable Photos syncing. This ensures that the photos from your iPhone will be available on your Mac.
Click Done.
- copiar imagenes de ipad a mac;
- formation mac os x lion gratuit.
- Transfer photo from iPhone X to Mac with EaseUS MobiMover Free!
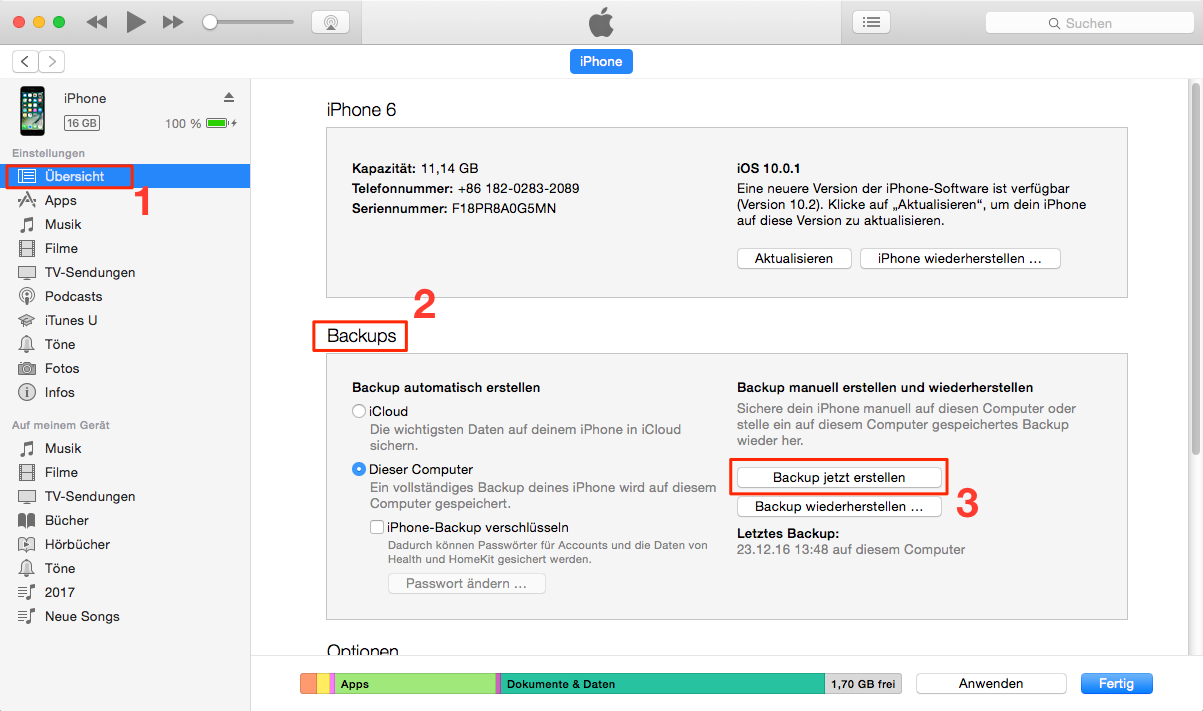
It's a blue button at the bottom of the window. Doing so saves your changes. You should now be able to view your iPhone's photos in the Photos app, though it may take some time for your photos to become available. How long will it take to transfer my photos form my iPhone to my Mac? It also depends on how many images you have, how big the images are and in what way you transfer them. It shouldn't take more than 10 minutes, though. Yes No. Not Helpful 2 Helpful 3. Yes, a flash drive would be a very easy way to do it, just copy the files onto the flash drive, then plug that into the Mac and select what you want to transfer.
Not Helpful 3 Helpful 2. You can Airdrop it from Mac to iPhone. You can also email yourself the picture.
Not Helpful 6 Helpful 2. You can use AirDrop or Bluetooth to transfer the picture.
Auf Mac Fotos in Ordnern speichern – Ohne iPhoto | Teamplace - Teamplace
You can also email the picture to yourself using the Mac, and then open up the email on your iPhone. Not Helpful 7 Helpful 2. After transferring photos to my iMac it says that there are unreadable files. How can I transfer the unreadable files? You can't transfer the unreadable files. You may want to try reformatting the files in question.
Not Helpful 4 Helpful 0. What do I do if my Mac computer isn't finding the photos on my iPhone? Make sure you are connected. Try restarting the computer and restart the phone. You can export photos in the original file format in which they were imported into your Photos library. A Live Photo is exported as two separate files: In the Photos app on your Mac, select the photos you want to export.
In the Photos app on your Mac, select the photo you want to export. Click the Share button in the toolbar and choose Set Desktop Picture. You can export videos so that you can share them or work with them in other apps. When you export a video, you can choose the movie quality and whether metadata such as a title or description is included with the exported file. In the Photos app on your Mac, select videos you want to export. Standard definition p is good for standard-definition TV. If the video will play on a high-definition TV or display, choose one of the high-definition formats: For example, if you export videos from several different moments, you can have Photos export each moment as a subfolder named after the moment.
Choose None to export the videos as individual files without subfolders. You can export slideshows to share with others. When you export a slideshow, Photos creates a movie file with the video format that you select. In the Photos app on your Mac, click a slideshow under Projects in the sidebar. If the slideshow will play on a high-definition TV or display, choose one of the high-definition formats: To export the slideshow movie to iTunes so that you can transfer it to another device, select the Automatically Send to iTunes checkbox.
To quickly export a group of photos to the desktop, select the photos you want, then drag the selection indicator at the top right of the window to the desktop. Export photos in a selected format You can export photos so that you can import and work with them in other apps. Open Photos for me In the Photos app on your Mac, select the item you want to export.
Click the Photo Kind pop-up menu and choose the file type for the exported photos. JPEG creates small-size files suitable for use with websites and other photo apps. PNG is another lossless file format popular for web images.