Mac g5 front panel wiring
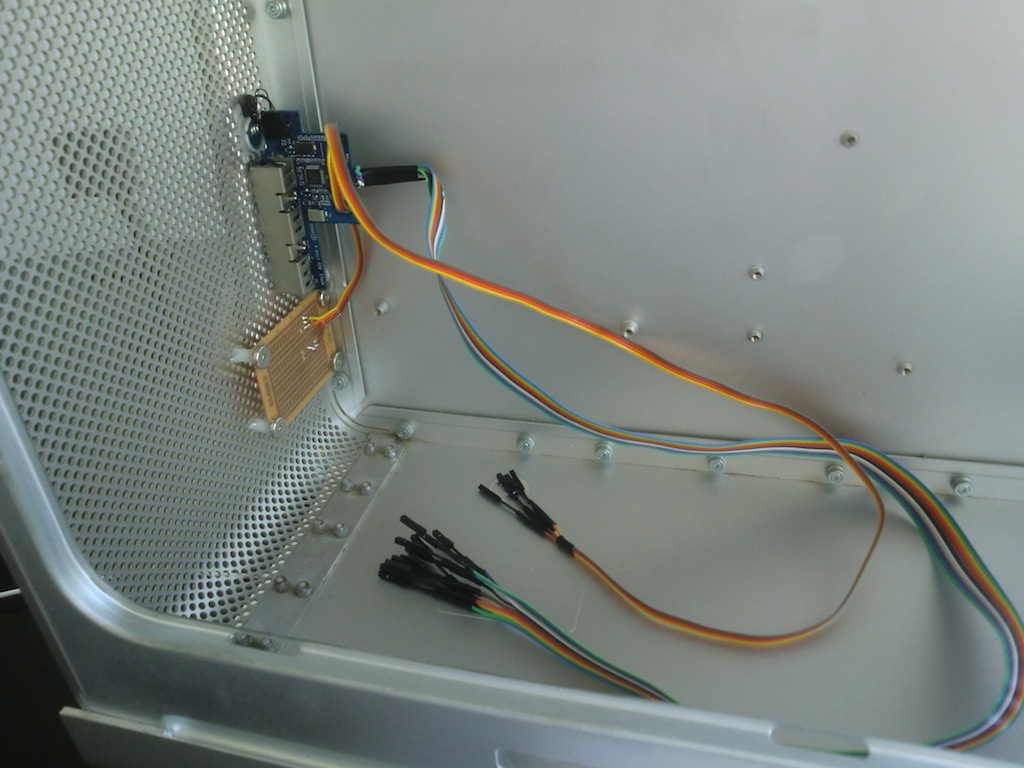
PDF version as a ZIP file at the end Note that there is some discussion on various G5 front panel wiring threads about the need to double-up the 12v for the As eelhead noted, this is not necessary. In the picture of my wiring harness below, I've not applied the heat yet, but at least you can see what the end-result will look like: I used some of the single pin molex connectors that I trimmed off the A connector they were "piggy-backed" off the main A mobo connector.

I carefully removed a couple of the wires from the 4-pin molex for the USB and gave them each their own single-pin connection. The power cable is the blue wire bundle at the bottom of the pic above. Hope this helps, gang!! Happy G5 case modding!! G5 Front Panel Diagram Annotated. Another great post boomr, I always look out for em Just when your about could you give your opinion on this http: Joined Nov 24, Messages Motherboard Nice, good job!
I failed with my wiring because I started it before my Mod was done. So my cable is to short for audio and nothing really works. I had fun doing my front panel wire, but I don't want to spent more time with it.
Kustom PCs - G5 Front Panel to ATX USB, Audio, Firewire, Power Cable
Thanks BoomR for pointing out the broken link! For completeness sake, here is the revised link.
Thanks, chaos! I appreciate the update! Thread starter zpowell1 Start date Feb 7, I know the front panel cable has to be grounded, and is normally done through the firewire, so how would I go about grounding? You'd connect it to ground somewhere, for example one of the PSU ground cables of which there are plenty.
- lecteur cd mac marche pas;
- kraft homestyle mac and cheese bowl coupon.
- BoomR's twist on the G5 Front Panel Quick Guide | tonymacxcom?
- Powermac G5 Wiring Diagram | Wiring Diagram.
- 6 posts in this topic;
- No Firewire port on MoBo, G5 front panel cable issue. | tonymacxcom.
Instead of cutting into your psu cable. Just ground to any ground on the motherboard. Ie power switch -, power led -, usb ground ect. They are all tied together, or are normally at least. I have the same mobo and had to make my own cable.
I ended up creating a schematic for anyone to use: Or sign in with one of these services Sign in with Facebook. Sign in with Twitter. By willrockhopper , January 11, in Mods and Overclocking G5 mod modding front panel front panel wiring wiring powermac g5 powermac late Posted January 11, Audio Left Audio GND Audio Right GND LED USB D- Any help on this would be great!
Share this post Link to post Share on other sites.
No Firewire port on MoBo, G5 front panel cable issue.
I dont have experience with the late G5 front panel, but in the older ones goes like this: So, now I'm past that confusion I'm ready to solder the cables onto the contacts. Let me know if you see anything that is incorrect. Posted February 11, Posted January 7, Cheers Will. Create an account or sign in to comment You need to be a member in order to leave a comment Create an account Sign up for a new account in our community. Register a new account. Sign in Already have an account?
Sign In Now. Similar Content. I wanted to push watercooling to the most. While gaming and also for working. Quite a challenge and a lot to learn. Thoughts on water-cooling: It always depends on the use-case if water-cooling is more silent than air-cooling. My personal experience: Air-cooling is more silent in idle load scenarios when you just do some easy tasks like browsing or office Water-cooling is more silent for constant high load e. That leaves only the pump running.
Undervolt the pump to e. If your BIOS does not allow that, you could use a resistor-adaptor to slow it down. So, I am officially crazy Did I mention I was crazy?! This time I wanted everything to be perfect: I am done now and it is time to share my experiences: It was a rough 6 months from start to finish. The project kept me busy during all of the winter.
I worked every weekend on it, till late. I need to apologize… …to my family for occupying their workshop, guest rooms and garages …to my friends for neglecting them during the last months …to the dogs and the cat for waking them up from their afternoon nap every now and then because of the metalwork-noise. I hope to be able and show everybody that it was worth it - And that someone out there is appreciating the work, as well. Back me up, guys - Spread the love: Finished Builds: But it would be so much fun to do it, now that all the hard work is done. One was for a music-studio.
One for my brother. Threads for the finished build projects will be linked here later: The Apple logo is gone after painting… For the better, I think! All the planning that goes into modding one case actually affected 26 cases. It had to be perfect. Then I applied every individual operation to all cases, one after another. This raised the quality of all cases. The metalwork Filing, sanding, equalizing, gluing and painting took a very long time. It probably took a couple of days per G5. Then I broke my shoulder in May doing something stupid on an Austrian glacier.
Plug-n-Play
That made it harder to do the sanding for a couple of weeks. The different case-types: The painting turned out very well. I chose the best 14 cases after painting and decided to finish modding them, completely. In the pyramid-pictures they are always on top, because they were finished last and taken to the workshop more often. No more hard work needed to finish the build. Just missing a motherboard and maybe hard drives - and done. Some orange peel here and there. Only 4 of them have stronger orange peel. They are also clean and modded.
I chose the best ones in the end. We disassembled everything and sorted the parts — plastics, aluminium, batteries, electronics, etc… then gave everything to recycling. I am an environmental engineer, so this was important to me. I gave away all parts that could possibly be reused - Like fans, RAM and graphics cards. There are no pictures of the disassembly, because it has been done by many people already and we were also too busy it took a couple of days. We ended up making our own tools and screwdrivers for removing the processors and mainboards, because many screws are hard to reach.
All parts that I wanted to keep were cleaned and kept separately. Best thing to do: