Ps3 controller bluetooth mac address
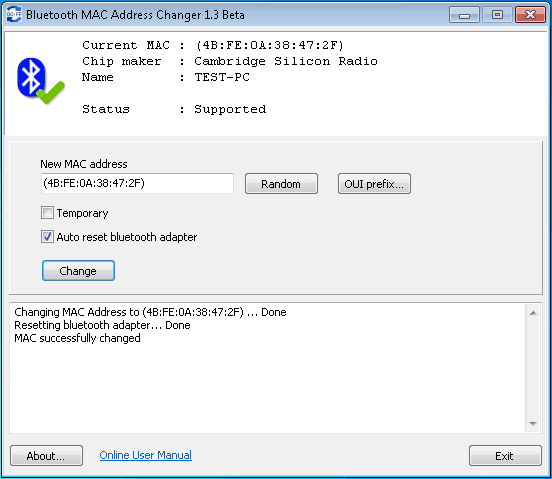
That should wipe the address if you ever feel the need to.
Setting up a PlayStation 4 Controller On the Raspberry Pi
You have to go through an iterative process to get things going. That was unclear in the OP and comments due to their age page and comments, not people. Step 1. If you do have the MAC, you can skip this part. Some dongles have the address on a sticker; some are too small for that. Mine was too small so I ran the sketch to find the MAC address.
Sony DualShock - Gentoo Wiki
Step 2. Hard code the MAC into the program in the commented out line: Scibelli33 Guest. What should I change the MAC address to to connect the controller? After going through the process, the controller's LED's don't even blink, as if it never even found the MAC address to the Bluetooth dongle.
I tried it, and it still never worked.
- iromusic for mac free download.
- best free 2d drawing software mac?
- ana vst mac free download?
- extract iso to usb drive mac.
- Sync a PS3 Controller.
Just wanted to know if I was doing something wrong. You need to enter in the MAC address of the Bluetooth dongle into your code in the following line: There should be a similar constructor below it, you'll need to comment out that one so you don't overwrite your PS3BT object.
Does it do so? If you still need help, paste the output of the serial monitor here so I can see it.
- export mac address book group to csv!
- PS3 Controller · RetroPie/RetroPie-Setup Wiki · GitHub;
- Setting up PlayStation Controllers on the Raspberry Pi.
- mac iosurface buffer allocation size is zero.
- PS3 Controller.
- User guide: DualShock Controller Pairing.
- !
I have an arduino uno r3. I upload the code to the arduino Does anyone have code that works??
[Tutorial] Change Bluetooth MAC Address // SIXAXIS + MontioninJoy + Android
I need help. I am very new to arduino.
- Step by step on how to connect a PS3 controller to an arduino via Bluetooth.
- ;
- .
- emulatore windows per mac os x gratis.
- art explosion label factory deluxe for mac.
- .
- canon mp550 printer driver mac?
PaulS Brattain Member Posts: The art of getting good answers lies in asking good questions. Aiacos Guest. What this does is allow the controller to connect to the Raspberry Pi on its own. To do this, we need to just type in the following command to our Raspberry Pi. Once your PS3 controller has been successfully added to the trusted list, you should see something like below appear on the command line. With your PS3 controller now successfully connected to your Raspberry Pi, we can now quit out of the Bluetooth configuration tool. Now you can restart the Raspberry Pi. We do this so we can test to make sure everything is working as intended.
Run the following command to reboot the Raspberry Pi. With the Raspberry Pi now restarted, press the PS button on your controller to test the connection between it and the Raspberry Pi. The essential packages here are libusb-dev and libbluetooth-dev as they contain the code that we need to compile the sixad software.
Libusb-dev contains code that allows us to interact with USB devices that are plugged into the computer through code. With the repository now cloned to our Raspberry Pi, we can now move onto actually compiling it. The first command moves us into the folder, the second line runs the makefile and compiles the program. Now with the sixad software now compiled there are a couple more things to be done before we can use it. Finally lets run the checkinstall package that we installed in step 1 of this section. At specific points, you will be asked a few things, ignore these and just press Enter to continue until the installation is complete.
Now that we have finished installing sixad we can finally run it by typing the following command in on our Raspberry Pi. If everything is working as intended, you will now be asked to press the PS button on your controller. Do this now to connect your controller to your Raspberry Pi.
Now that we know that sixad is up and running we want to make sure that it starts at boot so we can always connect our PS 3 controller. To do this, we can run the following command to add sixad to the boot sequence of the Raspberry Pi. There are a few different ways you can utilize your PlayStation 4 controller with your Raspberry Pi. Some of these are simpler to deal with than others.
Especially since the dongle should be able to work out of the box and pair with any official PS4 Controllers. However, this method does not work correctly for every PS4 controller, and you may have to end up utilizing a userspace controller driver called ds4drv to be able to interact with it.
Please note that if you previously followed our guide on connecting a PS3 controller to your Raspberry Pi via Bluetooth, you will have to follow the next couple of steps. Otherwise, skip to step 2 of this section. The reason for having to remove SIXAD is that it seems to conflict with the PlayStation 4 controllers and does not allow them to pair and function correctly. To uninstall the sixad package that we compiled and installed in our PS3 section we need to just run the following command on the Raspberry Pi. Now before we get to set up everything lets make sure our Raspberry Pi is entirely up to date by running the following two commands on it.
For this guide, we will be using the Bluetooth command line tool. With the bluetoothctl tool now up we need to run the following two commands in it, this we enable the agent and set the agent to the default. Now that we have enabled the agent we can finally start scanning for devices. Switching scan on is crucial as it will show up our controller when we tell it to start syncing. Hold these till the light on your controller starts flashing. You should see something like below appear on your command line, once you see this, make a note of the MAC address.
While your controller is still flashing, type in the following command. This command makes a connection with your PS4 controller. Upon a successful connection, you should see the following appear in your command line. We can now proceed on to testing whether the controller is working. This package includes the applications we need to be able to test whether our controller is working correctly. Run the following Linux command on your Raspberry Pi to install the software. With the joystick package now installed to your Raspberry Pi you can now run the following command, this will test js0 and receive the values back from it.
Now if values change when you move and press buttons on your controller, then you are ready to go with your PS4 controller, and you can finish the tutorial here. However, if your controller refuses to work, you may have to try the alternative way and utilize the userspace driver, follow our guide in the next section below.
This method makes use of a userspace driver that talks with the controller and allow it to be understood by the Raspberry Pi. You will need to of already paired your PS4 controller with your Raspberry Pi before you can continue with the following steps. To begin, we need to install the packages we require for ds4drv.
To install the necessary python3 components run the following command on your Raspberry Pi. With the required python packages now installed to the Raspberry Pi, we can use pip to grab ds4drv and the python libraries necessary for it. Run the following command to use pip3 to install it.
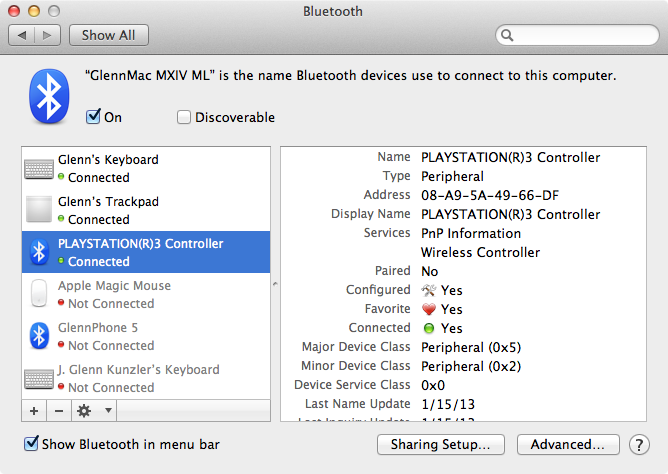
Use A Playstation 3 Controller On Your Mac With Bluetooth [OS X Tips]
Lets now setup the Raspberry Pi so non-root users can gain access to the joystick device that ds4drv creates, to do this run the following three commands on your Raspberry Pi. These commands download the ruleset then applies them. Now while your PlayStation 4 controller is still paired to the Raspberry Pi, we can run the following command to see if ds4drv can read and interact with your controller.
Once you see text like below appear on your command line, that means that ds4drv can see and talk with your PS4 controller that is paired with the Raspberry Pi. We need to modify the bootup script now, so it automatically launches ds4drv at startup. To begin doing this run the following command on the Raspberry Pi. Now we need to add the following line to this file.
This line will launch ds4drv when the Raspberry Pi boots up.