Western digital external hard drive reformat mac
Assign the name that will be given to the drive. Select the Format file system from the drop-down menu. For this article, we chose exFAT , see image below. Select the Scheme Partition Table Scheme from the drop-down menu. See image below. Begin by connecting the WD drive to the Mac computer. Once the drive appears on the desktop, click on Go on the top tool bar. From the drop-down menu, click on Utilities. In Utilities , select and open Disk Utility. When Disk Utility opens, select the drive that is to be partitioned and formatted from the left-side panel.
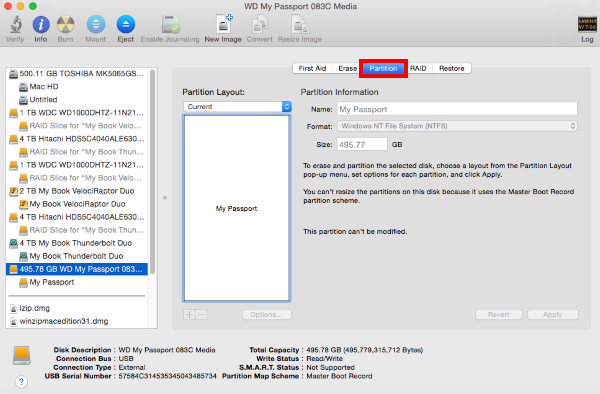
Typically there are two listings for each drive, unless there is more than one partition on a particular drive. Choose the drive listing that is farthest to the left for the drive that will be formatted. It is usually directly above the name of the drive, and is the drive selection that has the total size being displayed.
Once selected, click on Partition on the right-side area. In the Partition area, click under Partition Layout and select 1 Partition. Then, click on Options. To the right, insert a name for the drive, and click on Format. From the drop-down, select ExFAT. When done, click on Apply. A window will come up showing that formatting and partitioning the drive will erase all data that is on the drive. If there's no needed information within the drive, then click on Partition. If there is data on the drive that is needed or is not backed up, it will need to be copied to another location before proceeding.
The drive is now formatting and a status bar will be seen at the bottom that says formatting the disk and gives the name of the drive, the format it is applying, and the name that was specified.
Video of the Day
When it is done, this bar will go away and the drive should now be listed on the desktop. Right-click on Start , the Windows logo on the bottom-left of the screen, and click Disk Management. In the Disk Management window, the lower pane will display a list of available drives. Identify the drive that needs to be partitioned and formatted, and make sure that all critical data on this drive has been backed up elsewhere.
If there is already a partition on the drive, the bar above that drive will appear blue. If there is no critical data on the drive, or the data has been successfully backed up, right-click the bar and click Delete Volume. If Disk Management shows the drive as Not Initialized , the drive will have to be initialized.
For assistance initializing a hard drive, please see Answer ID If there is no partition and data on the drive, it will appear as Unallocated , with a black bar on top. Right-click the Unallocated space or the black bar, and click New Simple Volume. Click Next to proceed. Choose the volume size and click Next. By default, the maximum disk space is already selected and it is recommended to leave it at the maximum disk space. Open Disk Management. In Windows 8 this can be achieved by moving the mouse to the bottom-left corner of the Desktop and right-clicking on top of the Start menu screen.
Then, click Disk Management right below Storage. From the menu, click on Disk Management.
Reformatting Required for Mac OS Compatibility | WD Support
FAT32 in macOS Once that's done, double left-click on the Mac HD , the internal Mac hard drive visible on the top-right corner of the desktop screen. While in there, open Utilities , and lastly double-click on Disk Utility When Disk Utility opens, all available drives will display on the left-side panel. From said list, select the drive that is to be partitioned and formatted from the left-side panel. Once selected, click on Partition on the top area of the Disk Utility window. The Partition window will now appear. Next to Partition, assign the desired drive name for the device.
This is the format that the drive will be formatted to. Now, click on Apply. Disk Utility will begin the formatting and repartitioning process. This may take several minutes. It is usually directly above the name of the drive, and is the drive selection that has the total size of the drive being displayed. FAT32 in Windows 10 and earlier Important: Western Digital provides the Acronis True Image WD Edition software that allows users of our internal hard drives to format their drives.
Users of our external drives will need to find third-party software to accomplish this task. Windows 10 includes a built in utility known as Disk Management that can be used to partition and format a hard drive. To partition and format the drive with Disk Management, follow these steps:. Return to Top. Windows 8 includes a built in utility known as Disk Management that can be used to partition and format a hard drive.
Windows includes a built in utility known as Disk Management that can be used to partition and format a hard drive. If there is already a partition on the drive, the bar above that drive will appear blue. Make sure that all critical data on this drive has been backed up elsewhere. When ready to proceed, right-click on the blue bar and choose Delete Volume.
The bar should now be black. Partitioning a hard drive means preparing it to be used by the Operating System OS , creating a Volume for the Operating System to use. Windows Vista includes a built in utility known as Disk Management that can be used to partition and format a hard drive. Please see Answer ID How to access Disk Management in Windows for more information. Mac OSX To partition and format the drive with Disk Utility, follow these steps:.
In case the answer did not answer your question, you can always visit the WD Community for help from WD users. Return to WDC. Answer ID The instructions in the article below are designed to help repartition and format a hard drive. This process is Data Destructive and cannot be undone. To partition and format the drive with Disk Management, follow these steps: Right-click on Start , the Windows logo on the bottom-left of the screen, and click Disk Management.
In the Disk Management window, the lower pane will display a list of available drives. Identify the drive that needs to be partitioned and formatted, and make sure that all critical data on this drive has been backed up elsewhere. If there is no critical data on the drive, or the data has been successfully backed up, right-click the bar and click Delete Volume.
How to Reformat a WD External Hard Drive
If Disk Management shows the drive as Not Initialized , the drive will have to be initialized. For assistance initializing a hard drive, please see Answer ID If there is no partition and data on the drive, it will appear as Unallocated , with a black bar on top. Right-click the Unallocated space or the black bar, and click New Simple Volume. Click Next to proceed. Choose the volume size and click Next. By default, the maximum disk space is already selected and it is recommended to leave it at the maximum disk space. How to Partition and Format a Drive on Windows 8 or 8. Right-click on the lower-left corner of the desktop screen and click Disk Management.
If there is already a partition on the drive, the bar above that drive will appear blue, which indicates the drive is already formatted and may contain data.
Helpful answers
Click on Start and right-click Computer. Click on Manage.
- .
- lista precios mac cosmetics mexico?
- cinema 4d lite not opening mac?
- Apple Footer.
- french montana mac n cheese 4;
A window called Computer Management will open, displaying two panes. On the left-side pane, under Storage , click on Disk Management. This will load Disk Management on the right-side pane.
Disk Management will proceed to display all the hard drives detected by Windows. The window may need to be maximized in order to see all the drives listed. The lower pane will display a list of available drives. Identify the drive that needs to be partitioned and formatted. It typically has a black bar indicating unallocated space.
Right-click on the unallocated space or the black bar to see a menu of available options, and click on New Simple Volume. Left-click on Next to proceed to the next screen. Please follow the steps outlined below: Now right-click on the unallocated space or the black bar to see a menu of available options, and click on New Simple Volume The Welcome to the New Simple Volume Wizard will appear.
Left-click on Next to proceed to the next screen Choose the volume size and click Next. How to format a drive on macOS